Eggplant Parmesan…my way!!

20 Comments

IMG_3144

As I have mentioned in a recent post my Dad has a garden and so another vegetable that has been a plenty is Eggplants.
Most of the summer, I would grill them or just roast them in the oven, and a couple of times I made Eggplant Parmesan.  I would post my pictures on facebook and of course my friends say tell me the recipe.

So this last time I tried to remember as making it to take pictures of the process and what I do 🙂

First I used my homemade tomato sauce that I made out of the tomatoes from my Dad’s garden and I love using Fresh Mozzarella 🙂

So enjoy!!

First I peeled, sliced then sprinkled slices with salt in a colander
for 30-40 minutes, then pat each slice dry with paper towel. 
(LOL of course the first picture of that I forgot to take)
Then place them on a baking sheet 

IMG_3177

I took panko bread crumbs and fresh grated Parmesan Cheese

IMG_3174

Mixed in some Sandwich Sprinkle from Penzeys
(coarse salt, garlic, black pepper, basil, oregano, rosemary, thyme and marjoram)
you can add Italian seasonings as well

IMG_3176

Put about 2 Tbsp. on mixture on top of each slice

IMG_3178

with your hand press down crumb mixture

IMG_3179

Then I sprayed each piece with PAM – Olive oil spray
of course you could drizzle with olive oil if you wish too.

IMG_3180

IMG_3182

Then bake in a 385 degree oven until tops are brown

IMG_3185

Sauce you can use any you like, so pick your favorite
I used my homemade sauce and I added
some of the Sandwich Sprinkle to the sauce

IMG_3183

I have some Fresh Sliced Mozzarella

IMG_3184

In a sprayed baking dish, place a eggplant down
and top with sauce

IMG_3186

Then top with a slice of mozzarella

IMG_3187

Place another piece of eggplant and repeat
with sauce and cheese

IMG_3188

I topped the final piece of cheese with the rest of the sauce

IMG_3189

I had crumb mixture leftover

IMG_3190

and I sprinkled some over top the entire dish
And bake at 385 degrees until brown 

IMG_3191

and cheese is melted and brown

IMG_3194

IMG_3195

IMG_3196

This was so good, most of the time I don’t measure anything so when
I cook unless I write it down it really just turns out to what I have 
in my pantry and such.  So when I am experimenting and it turns out good, I have to remember what I did so I can share in a blog, and then most the time I don’t take picture either 😛 LOL
The last time I made this (pictures below), I did the same except I didn’t have
any crumb mixture left, so I sprinkle the final layer with a little parmesan chesse

They both turned out delicious 😛 so as you make yours just make to what you like and
it will be just as Delicious!!

IMG_3148

IMG_3151

IMG_3150

Eggplant Parmesan

  • Servings: 4-6
  • Difficulty: easy
  • Print

4 medium size eggplant, peeled, sliced a 1/2- 3/4 inch thick (6 slices from each)
3 cups of tomato sauce
3 Tbsp. Penzeys Sandwich Sprinkle or Italian seasonings, divided
2 cups panko bread crumbs
1 cup fresh Parmesan cheese, grated
Fresh Mozzarella sliced, 2 slices for each stack
(used 1 1/2 logs for 8 stacks, so 2 logs would work for 12 stacks)
PAM Olive Oil spray

Sprinkle each slice of eggplant both sides lightly with salt, place slice in colander in the sink,
let set for 30-40 mins.  Then pat each piece with a paper towel, doing this helps draw out the bitterness that some eggplants tend to have.

In a bowl add panko, Parmesan and 2 Tbsp. seasonings; mix together.  Place slices on a baking sheet and put about 1- 1 1/2 Tbsp. of mixture on top, press mixture down with hand then spray with olive oil spray.
Crumb mixture does fly around a little that is why I press down the mixture, you can drizzle tops with olive oil if you wish.  Bake at 385 degrees until tops are brown about 25 minutes or so. 

Meanwhile get your tomato sauce ready, mix in 1 Tbsp. seasoning, have mozzarella slices ready.
Spray a baking dish that will hold the amount you are making.

Once eggplant tops have browned, place half the slice in the baking dish, top with 1 – 1 1/2 Tbsp. sauce,
then a slice of cheese, repeat again, eggplant, sauce and cheese.
At this point you can top each stack with leftover sauce and sprinkle with any left over crumb mixture, or just sprinkle some a little Parmesan cheese over top.  Bake at 385 degrees until light brown and cheese is bubbly.  

You can really make this your own, you like more sauce use more sauce, or cheese even, if you want to stack 3 high then stack 3 high.  These a great meal served with a simple salad on the side.

Enjoy!!!


Honey Blueberry Upside-Down Cake

10 Comments

Test Kitchen was back open last week and I had some Blueberries so I thought why not a Blueberry Upside-Down Cake 🙂

Great for breakfast with your coffee or tea, maybe as an afternoon snack or after dinner, I hope you make it for your next baking adventure 🙂

As I thought about the topping I thought I would cut the brown sugar with some honey, hence the name 🙂 so this is my recipe 🙂

photo (2)

Ingredients

IMG_20140810_185656


Spray your pan, draw out the bottom of the pan on parchment and cut it out

IMG_20140810_191748


Place parchment in pan and spray paper

IMG_20140810_191921


I fail to take a picture of the topping melting, but just melt butter, brown sugar and honey together
and pour in pan

IMG_20140810_192015

sprinkle blueberries over the topping in the pan

IMG_20140810_192415


Cream together the butter & sugar until fuffy
then add eggs, one at a time

IMG_20140810_192607

then add lemon juice and vanilla, then add flour and milk (read below)

IMG_20140810_192817


Fold in lemon zest

IMG_20140810_193137


pour on top of blueberries and bake

IMG_20140810_193258

let cool for about 10 minutes

IMG_20140810_201252

place platter on top of cake and flip upside down

IMG_20140810_202828

and there you have your Honey Blueberry Upside-down Cake
let cool completely

IMG_20140810_203006 IMG_20140810_202941

slice and serve

photo (5)


Honey Blueberry Upside-Down Cake

  • Servings: 8-10
  • Difficulty: easy
  • Print

Topping

1 pint fresh blueberries (if using frozen use 2 1/4 cups)
1/4 cup honey
1/4 cup light brown sugar, packed
1/2 stick unsalted butter (1/4 cup)

Cake

1 1/4 cups cake flour
1 tsp. baking powder
1/4 tsp. salt
1 cup sugar
1 stick unsalted butter (1/2 cup), softened
2 eggs
1 tsp. vanilla
1/2 cup whole milk
2 tbsp. lemon juice
zest of 2 lemons

Heat oven to 350 degrees, spray a 9×2 round baking pan with baking spray and line the bottom with parchment paper.

Add 1/2 stick butter (1/4 cup), honey and brown sugar to a small sauce pan and heat over medium heat until mixture is melted and smooth, stirring frequently.  Pour into baking pan; top with blueberries, set aside.

Whisk cake flour, salt and baking powder in a small bowl, set aside.

Beat sugar and stick (1/2 cup) butter in a large bowl at medium speed for 2 minutes or until smooth and fluffy.  Add eggs one at a time, beating well after each addition.  Beat in lemon juice and vanilla, at low speed beat in flour mixture in 3 parts alternately with the milk, beginning and ending with the flour mixture.  Fold in lemon zest then pour over top of the blueberries; smooth out evenly.

Bake for 30 – 40 minutes or until toothpick inserted in center comes out clean, cool in pan on wire rack for 10 minutes.  Using a small knife, loosen  cake from the side of pan, invert onto platter; remove parchment paper, cool completely.

This was super moist and honey delicious 🙂 Enjoy!!!

photo (3)

Crispy Red Pepper Jelly Chicken Tenders!!

9 Comments

Braswell’s Red Pepper Jelly…Yum!!!

IMG_20140724_173407

IMG_20140724_164055

I got a couple of samples of this jelly from the office and well my mind starting thinking of something to do with it.
Of course what most people do with it is pour it over cream cheese, which is good…but

When I got home I was like I want crispy chicken tenders, I thought why not use the jelly 🙂

So I added the Jelly to my eggs mixture and it worked out awesome, this Red Pepper Jelly is great you can use it on some many things, here are just few that I thought of:

Brush on Grilled Corn
Mix into your Corn Bread or Muffin Mix
Brush on Grilled Chicken or Pork
Brush over grilled peach halves or pineapple rings, serve with slices of grill pound cake
I could go on and on 🙂

Diffidently worth a try for sure!!

IMG_20140724_164032

IMG_20140724_164209

whisk jelly and egg together

IMG_20140724_164621


IMG_20140724_165253

Seasoned flour

IMG_20140724_164918

chicken tenders

IMG_20140724_164647

dredge the tenders in flour

IMG_20140724_164941

coat in egg mixture

IMG_20140724_165022


dredge in panko

IMG_20140724_165152

place on baking sheet and spray with olive oil

IMG_20140724_165646

Bake at 400 degrees

IMG_20140724_172929

microwave jelly to drizzle

IMG_20140724_173151

Drizzle over top the tenders and enjoy!!

IMG_20140724_173250

IMG_20140724_173519

Chicken Tenders

seasoned flour
egg
Panko breadcrumbs

I keep seasoned flour in my freezer so I have it whenever I need to coat something.
Mix together egg and a couple tablespoons of the jelly and whisk together
Place panko in shallow dish or on a plate

Dredge chicken in flour to coat, then coat with egg mixture and then dredge in panko and place on baking sheet, spray chicken with an olive oil spray and bake at 400 degrees until chicken is done about 20 minutes.

Take a couple of tablespoons of the jelly and heat in microwave for 15 seconds and drizzle over the chicken.

I really enjoyed the sweet heat to the chicken tenders will make this again so sure, so hit up your local Remke Markets or your local grocery for Braswell’s Red Pepper Jelly!!

IMG_20140724_173314

Cinnamon Quick Bread…Two Ways!!!

15 Comments

IMG_20140514_144602

Cinnamon Strawberry and Cinnamon Strawberry & Blueberry!!

I always have strawberries in the freezer for my kale smoothies 🙂 I will buy various fresh fruit, clean it, cut it up and freeze it, then I always that it on hand 🙂

So I was trying to think of a quick bread to make and well the strawberries came to mind, when I was testing my double batch (so I could give to family and friends) I was a little heavy handed with the cinnamon…but I have to admit it was pretty good and I got great reviews 🙂

I recently got some Coconut sugar and I had been wanting to use it, so I try it again but this time with blueberries, coconut sugar, coconut oil and whole grain pastry flour, this one is a little healthier for you 🙂

Here are both recipes, make both or just one of them…they both are Great!! 🙂

1st – Cinnamon Strawberry

IMG_20140514_120506

2 bowls, one wet, one dry

IMG_20140514_122703

whisk each individually, add strawberries to wet

IMG_20140514_133044

mix together

IMG_20140514_133224

then mix in the dry

IMG_20140514_133510

put into loaf pans and bake

IMG_20140514_144602

IMG_20140514_144726

IMG_20140514_151236

Cinnamon Strawberry Quick Bread

  • Difficulty: easy
  • Print

2 1/2 cups fresh strawberries, cut in quarters (if frozen, let thaw)
3 1/4 cups all-purpose flour
2 cups white sugar
1 1/2 tsp. baking soda
1 1/2 – 2 tbsp. cinnamon
1 1/2 tsp. salt
1 1/4 cups canola oil
4 eggs

Preheat oven to 350 degrees, spray two 9×5 inch loaf pans or 5 mini loaf pans.

In a large bowl add flour, sugar, cinnamon, salt and baking soda, whisk until fully combined.

In a med bowl whisk together eggs and oil; fold in strawberries, then pour into flour mixture and fold together just until combined.
Scoop into loaf pans and bake.

For mini pans bake 30 – 35 minutes for larger loaf pans 45 – 50 minutes, always check at first time by inserting a toothpick in the middle and if it comes out clean it is done.

2nd more healthy for sure – Cinnamon Strawberry Blueberry

IMG_20140523_090454


whisk dry in one bowl, add blueberries, toss around to coat

IMG_20140523_092247


mix wet with strawberries

IMG_20140523_092342

then add to dry

IMG_20140523_092430

put into loaf pans and bake

IMG_20140523_093029

IMG_20140523_100931

Loaf is much darker because of the coconut sugar

IMG_20140523_190136

IMG_20140523_190450

Cinnamon Strawberry Blueberry Quick Bread

  • Difficulty: easy
  • Print

2 cups fresh strawberries, cut in quarters (if frozen, let thaw)
1 cup blueberries
3 1/4 cups whole grain pastry flour
2 cups coconut palm sugar
1 1/2 tsp. baking soda
1 1/2 – 2 tbsp. cinnamon
1 1/2 tsp. salt
3/4 cup canola oil
1/2 cup coconut oil in liquid state
4 eggs

Preheat oven to 350 degrees, spray two 9×5 inch loaf pans or 5 mini loaf pans.

In a large bowl add flour, sugar, cinnamon, salt and baking soda, whisk until fully combined, toss in blueberries and mix around to coat.

In a med bowl whisk together eggs and canola oil; then whisk in coconut oil, if you need to heat a little to melt then do so, just let cool down first before adding it to egg mixture, fold in strawberries, then pour into flour mixture and fold together just until combined.
Scoop into loaf pans and bake.

For mini pans bake 30 – 35 minutes for larger loaf pans 45 – 50 minutes, always check at first time by inserting a toothpick in the middle and if it comes out clean it is done.

Enjoy both these recipes I hope you make them both!!! 🙂


IMG_20140523_190630

Bread Pudding

8 Comments

IMG_20130828_123818

Bread Pudding…you either love it or hate it 🙂

I don’t think there is any in between 🙂

I myself like Bread Pudding…if it made well…believe me I had some that I’ve wanted to spit out 😛

But I must say I have had great success making Bread Pudding 🙂

As part of what I do in my job, we host wine dinners, beer dinners, customer appreciation dinners.  One of the dinners that happens each month is a Wine dinner with a local radio station and the morning DJ’s and their winners.  They are Bob and Marianne…Check out photo below…doesn’t he look familiar….think “Entertainment Tonight”

bob_marianne_radio-620x394

Yes Bob Goen…well he is just the nicest person ever!! 🙂

Our dinner for them included the following courses, each with a wine pairing

1st. course – Trio of Crostini’s
2nd. course – Mini cheese Ravioli’s with Apples and Walnuts with a Balsamic glaze
3rd. course – Zen Blend Salad with strawberries, blueberries, goat cheese crumbles, candied walnuts with a Balsamic glaze dressing
4th. course – Parmesan Chicken cutlet, with Whole Wheat Pasta served with Sweet Peppers, Kale  tossed in Arrabiata Sauce
5th. course – Lemon Marmalade Bread Pudding – recipe below 🙂

They loved everything 🙂

Side note****
But today is my Birthday 🙂 and when its your birthday you bring treats into the office and well I made the Lemon Marmalade Bread Pudding along with a Wild Blueberry 🙂


Ingredients

IMG_20130828_101519

Bread

IMG_20130828_101728

Cube it up

IMG_20130828_101929

place on baking sheet

IMG_20130828_102030

bake

IMG_20130828_103232

divide marmalade

IMG_20130828_102818

add butter to saucepan with marmalade

IMG_20130828_103955

stir and melt

IMG_20130828_105955

add mixture to cubed bread in a large bowl

IMG_20130828_110136

toss to coat bread, set aside

IMG_20130828_110157

add half and half to marmalade jar

IMG_20130828_103405IMG_20130828_103439

Shake

IMG_20130828_103550

add jar mixture, rest of the half and half, sugar, eggs, egg yolks, vanilla (lemon juice & zest)

IMG_20130828_105552

whisk together

IMG_20130828_105839

pour custard over bread cubes

IMG_20130828_110300

mix together, set aside for 30 minutes

IMG_20130828_110404

Spray ramekins

IMG_20130828_113516

add bread-custard mixture, place on baking sheet, bake

IMG_20130828_114008

IMG_20130828_114030

after baking

IMG_20130828_122544

top each ramekin with the remaining marmalade

IMG_20130828_122731

Recipe – Lemon and Wild Blueberry Bread Pudding

12 oz. package of King’s Hawaiian Rolls, bread, sub rolls, buns…it all works 🙂
1 quart Half and Half
1 cup granulated sugar
2 whole eggs
2 egg yolks
1 tsp. vanilla
2 tbsp. butter

For Lemon – zest and juice of 1 large lemon
                         1 jar Lemon Marmalade 12.35 oz – 14 oz. 

For Wild Blueberry – 1 cup frozen or fresh blueberries 12.35 oz. – 14 oz.
                                        1 jar Wild Berry or Blueberry preserves

Cut bread into 1 inch cubes, toast on baking sheet in oven at 350 degrees, until golden brown about 10 minutes or so, let cool, once cooled add cubes to large mixing bowl, set aside.

Remove a 1/4 cup of the marmalade and set aside, take the rest of the marmalade and add to a small sauce pan with the butter, on medium heat, warm marmalade and melt butter, stirring to combine.

Once butter has melted, pour mixture over top the toasted bread cubes and toss to coat, set aside.

Take empty marmalade jar and add 1/2 cup of the half and half, shake vigorously to loosen any thing left to the sides of the jar.   In a medium bowl add that mixture, the rest of the half and half, sugar, vanilla, eggs and egg yolks, whisk to fully combine.  

(If making Lemon at this point add zest and juice to the wet mixture whisking to combine)

Pour custard mixture over the coated bread cubes, mixing together, let stand for 30 minutes, pushing bread cubes down into the custard occasionally. 

After 30 minutes, pre-heat oven to 325 degrees

Distribute the bread-custard mixture into buttered or sprayed ramekins, I used 10 8 oz. ramekins filling them about 2/3 the way full.  

(If making Wild Blueberry, top each ramekin with a little of the blueberries)

Place on a baking sheet and bake for about 40 minutes, remove from oven and and using the set aside marmalade spoon over top each ramekin.  Bake for an additional 5 minutes.

IMG_20130828_171530

Serve and Enjoy!!!

IMG_20130828_171622IMG_20130828_171722

Brown Bread!!

12 Comments

No I don’t mean like Whole Wheat bread…I mean Brown Bread, this is a sweet or quick bread and bake in a CAN!!  

IMG_20130726_142609

Yes I said a can…you know a can that veggies come in or soup 

I grew up having brown bread in our house my Mom would make this as well as my Grandma…I don’t think I ever thought it was odd baking it in a can…I was a kid it was a cool thing 🙂

Wikipedia says – 

New England or Boston brown bread is a type of dark, slightly sweet steamed bread (usually a quick bread) popular in New England. It is cooked by steam in a can, or cylindrical pan.
Brown bread’s color comes from a mixture of flours, usually a mix of several of the following: cornmeal, wheat, whole wheat, graham flour, or rye, and from the addition of sweeteners like molasses and maple syrup. Leavening most often comes from baking soda (sodium bicarbonate) though a few recipes use yeast. Raisins are often added. The batter is poured into a can, and steamed in a kettle. While most variations are quick breads, and can be made in less than an hour, several commercial brands are available. Brown bread is somewhat seasonal, being served mostly in fall and winter, and is frequently served with baked beans.

I really had forgotten about this Brown Bread until I read this blog “A Small Insight” http://asmallinsight.wordpress.com/2013/04/09/mammas-fruit-loaf/
Lucy call it “Mamma’s Fruit Loaf and when I read this post and saw what it was, I immediately thought of Brown Bread 🙂 

So go to her blog and check her out and her recipe for her Mamma’s Fruit Loaf 🙂

All  know is that I really was not a big fan growing up, but now this stuff if great and I like mine with butter, now my Mom likes her’s with cream cheese.  So its up to you on which way you eat it, its also good heated in the microwave 🙂

My recipe here is is made with a couple of can, I also used small paper loaf pan, easy to give as gifts and I made some today for our office and I used a Bundt pan and it just came out so nice…perfect with you were having people over for coffee or tea, it’s perfect.

Now I did compare my brown bread to the ‘Can” kind you find in the store and let me say, I thought the store bought one was very dense, dry, very little raisins compared to mine.  And the flavor well I am sorry to say it was just plan awful…sorry if you like it, I just didn’t care for it 🙂

Store bought

IMG_20130726_114939IMG_20130726_115243IMG_20130726_115347IMG_20130726_115442


Ingredients

IMG_20130726_120106


Raisins and water in a small sauce pan

IMG_20130726_120508

IMG_20130726_120540IMG_20130726_120624


add flour, salt, baking soda and bran/bran buds to bowl 

IMG_20130726_121509


Mix together
IMG_20130726_121614

cream butter and sugar

IMG_20130726_122932


IMG_20130726_123109


stir in egg and vanilla

IMG_20130726_123241


IMG_20130726_123311


add dry mixture and stir a little

IMG_20130726_123357

IMG_20130726_123436


add raisin mixture

IMG_20130726_123543


Fold to combine

IMG_20130726_123613


pour batter into your containers

IMG_20130726_124005


bake

IMG_20130726_132140


this is the can

IMG_20130726_134203


this looks so good

IMG_20130726_142506


this is store on left and mine on right

IMG_20130726_142732


You can see that mine has so many more raisins

IMG_20130726_142852


Both buttered and ready to eat

IMG_20130726_143006


Out come, like I said did not care for the store bought, took one bite 😦

Mine oh it looks so good!!!!

IMG_20130726_143229

Brown Bread Recipe

1 1/2 -2 cups raisins
2 cups water
1 cup Bran or Bran Buds Cereal
1 3/4 cup all-purpose flour
2 tsp. baking soda
1/2 tsp. salt
1 cup granulated sugar
2 tbsp. butter, softened
1 egg
1 tsp. vanilla

4 – 16oz. cans (fill 2/3 full)- bake for 35-55 minutes, small loaf pans (fill half full) – bake 30 minutes, large loaf pan (fill half full to 2/3’s) – bake 40 – 50 minutes, bundt pan (whole recipe) – bake 45 minutes.  With any of these just keep an eye on it, when you stick a toothpick or skewer in bread it should come out clean, it then is done.   Cool upside down on a cooling rack.

Pre-heat oven to 325 degrees

In a small to med sauce pan add water and raisins, bring to a boil over med-high heat, once it boils, remove from heat and set aside for 10 minutes.

In a small bowl add flour, bran/bran buds, salt and baking soda, stir to mix…set aside
In a large bowl cream together butter and sugar for 1 minute, then stir in egg and vanilla, then add dry mixture, stir it a little and raisin mixture, fold to fully combine.

Pour into your WELL greased or spray baking container, and bake.  Let cool enough to handle and then you can dig in 🙂

The Bundt pictures

IMG_20130821_172431


IMG_20130821_172537

Banana Bread!!!!

8 Comments

Okay who doesn’t like Banana Bread 🙂

IMG_20130726_143721

I love Banana anything…cakes, muffins, cookies, bread, ice cream, yogurt, candy!!!  

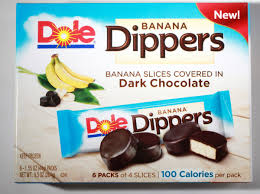
Oh and have you seen the **NEW** Dole Dippers, slices of bananas dipped in dark chocolate and FROZEN can you say

YUMMMMMMMMYYYY!!!!!!   download

I can, I have had them and they are addicting, they even have them with chopped almonds sprinkled on top too 🙂  They come 6 packages in the box, 100 calories a package, so well worth it 😛

So have a pack of those so when you have a slice of this Banana Bread you will not feel so guilty 🙂

So we’ve all had the few bananas sitting on the counter that are slightly or way past their prime…right 😛

I think what most people think of when that happens to the bananas is….BANANA BREAD TIME!!

So here’s my Banana Bread recipe 🙂  Hope you enjoy it!!

Ingredients

IMG_20130726_122341


whisk together, four, salt and baking soda

IMG_20130726_130728


add bananas to bowl and mash

IMG_20130726_125404

then add sour cream and vanilla to bananas

IMG_20130726_125734

mix together

IMG_20130726_125811

cream butter and sugar

IMG_20130726_125955

for about 3 minutes

IMG_20130726_130206


add egg yolks

IMG_20130726_130404

beat to combine

IMG_20130726_130624

fold in half flour mixture

IMG_20130726_130816


IMG_20130726_130848

then add banana mixture and rest of dry

IMG_20130726_130918


IMG_20130726_131007


IMG_20130726_131058

beat egg whites just until frothy

IMG_20130726_131212


IMG_20130726_131251

fold into batter, but don’t over work it

IMG_20130726_131318

IMG_20130726_131400


I used mini loaf pans, you can also find paper baking loaf size too, for easy gift giving

IMG_20130726_124253


IMG_20130726_131914


Then bake and done

IMG_20130726_140624


This recipe is so moist you will never use another 🙂

IMG_20130726_143858

Recipe

1 stick of butter, softened
1 1/2 cup granulated sugar
2 eggs, yolks and whites separated
1 1/2 cup all-purpose flour
1 tsp. baking soda
1/4 tsp. salt
4 tbsp. sour cream
3 overripe bananas, mashed
1 tsp. vanilla

Preheat oven to 325 degrees

pans – 8 1/2 x 4 1/2 x 2 1/2 loaf pan, or mini loaf pans or small bundt pan.

In a small bowl add mashed banana, sour cream and vanilla, mix to combine.

In another small bowl add flour, salt and baking soda, whisk to combine, set aside.

Cream butter and sugar together in a large bowl for about 3 minutes, then add egg yolks and beat until combined.
Fold in 1/2 of dry mixture, then add banana mixture and the rest of the dry.

In a clean dry bowl add egg whites and beat for about 30 – 45 seconds just until frothy, then fold egg whites into the batter.

Just until combined, try not to over work the batter.

Bake for regular size loaf pan 45 minutes to 1 hour, mini loaf pans about 30 minutes, check by inserting a toothpick in the center and comes out clean.

Enjoy!!!!

IMG_20130726_143758

Mango Wrapped Coconut Macadamia Nut Crusted Tilapia

7 Comments

fish 1I love me some fresh seafood, I wish I lived on the coast just for this reason.  When I worked on a cruise ship having fresh seafood in every port was not an issue, it was amazing!!!

Myself and my friends would have our favorite spots to go to in each port, and although they all had great fresh seafood, there was one place was my favorite…Cozumel Mexico!

We would go up into town, now I mean up in town past all the tourist spots where the locals eat and shop, to the “Market”.  Now this was not like our kind of markets here in the US, although the market was in a building, there were no doors.
And everything was out in the open; fruits, vegetables, Meats, breads, oh yes I did say ‘Meats”, out in all it’s glory, hanging and flies everywhere.  Yes this was not appealing, but I really didn’t go there for the meat.  Of course the produce was out of this world fresh, oranges and melons that were so sweet it was like eating candy.  Fresh tortillas being made right in front of you, this was really was one the highlights of visiting Cozumel.
Right outside of this market was a courtyard in a “U” shape, and when it was closed it would look like just a bunch of garage doors.  But when open, the garage doors would lift to reveal all these individual kitchens.
All with there own specially dishes, but we only ate at this one kitchen every Friday like clock work.  We’d go early into the market get some fruit, veggies, really whatever appealed to us and what we wanted to cook for lunch.
Yes I said cook, this one Kitchen would let me use the kitchen to cook whatever we bought in the market, it was awesome.
The only thing we would get from them was some of the Freshest Red Snapper and Grouper I ever had, we’d be there when the doors opened and then here comes the fisherman walking up with a cooler.  He had just got off his boat with this fresh fish and we would pick the ones we want and the kitchen would cook it right up. Head, body, tail and all and serve up with white rice.  

red snapper
My boyfriend at the time loved the head, I will not go into detail on what he ate from that, I was happy to let him eat that part. LOL

So I came up with this fish dish for Fish Friday’s in my house!!  Plus it does have that Caribbean flare!

Mango Wrapped Coconut Macadamia Nut Crusted Tilapia

Ingredients

Fish 2

Coconut, panko breadcrumbs, macadamia nut

fish 5

in a skillet add butter, oil, shallots & red pepper

fish 6

Cook for about 2 minutes

fish 7

add panko breadcrumbs, nuts & coconut flakes

fish 8

fish 9

once combined (above), remove from heat and add brown sugar, set aside to cool

fish 13

peel mango

fish 3

with peeler, peel long ribbons of mango for wrapping

fish 4

I used a whole fillet and cut it in half

fish 10

starting at one end take mango ribbons and start wrapping fillets

fish 11

wrapped fillets

fish 12

add topping to each fillet, you can use as little or as much
(I used the leftovers for a salad topping – recipe to come)

fish 14

fish 15

then bake

fish 16

done

fish 17

fish 1

I served it with a Mango Avocado Salad with Balsamic Poppy Seed Dressing
(recipe coming soon)

fish 18

Recipe

Mango Wrapped Coconut Macadamia Nut Crusted Tilapia

1 whole tilapia fillet, cut in half 
1/2 cup panko breadcrumbs
1/2 cup macadamia nuts, chopped
1/2 cup coconut flakes, unsweetened
2 tsp. brown sugar, packed
2 tbsp. butter (you can use all olive oil)
2 tbsp. lime infused olive oil ***see note below
1 large shallot, chopped
1/4 tsp. red pepper flakes
1 mango
salt to taste

Add butter, oil, shallots and red pepper flakes to a skillet and cook over med. to med. high heat, once butter has melted cook for 1 – 2 minutes more.
Add breadcrumbs, coconut and nuts, stirring to coat with butter mixture, once all is coated then remove from heat stir in brown sugar and taste for needed salt.  Set aside to cool

Peel mango, then take peeler and run it around the mango, trying to make long ribbons of mango.  If they break that is okay you can piece it together. (the remaining mango, use in salad recipe)
Take ribbons and start at one end of the fish and continue wrapping to other end, place on baking sheet, top with breadcrumb mixture, you can add as much or as little as you want.  Keep leftover crumb mixture for salad topping.

Bake fish at 400 degrees for 10 – 15 minutes, you want topping to be golden brown, my oven I cooked it for 15 minutes and fish was perfect.

You can serve the fish with anything you like, I served mine with a salad, I will post that recipe in the next few days 🙂

***Note – Lime infused olive oil, I got this oil at a specialty store, you do not have to use this oil, you can use plan olive oil, if you want that hint of lime then add the juice of half a lime in the crumb mixture when you add the brown sugar, if you want more lime flavor add the juice of the other half, and you can always add the zest of the lime as well!!
You also do not need to use butter, you can just use 4 tbsp. oil in the recipe.

Hope you enjoy this one and hey tell all your friends about me and my blog…Enjoy!!

Rustic Fruit Tart

Leave a comment

This is my simply, easy and delicious go to dessert, well maybe my family’s cobbler is my first one I’d go to, but this is definitely a close second for sure.
I will make this all year around, with any kind fruit that appeals to me as I walk through the produce dept. or at my local farmers market.  I like using Apples, Pears and Plums mostly since I have at least one or combination of those always in the house.

pic 1

You can mix and match any combo you like, add in some blueberries, raspberries, cranberries, even nuts if you like.  I’ve added those huge Red Holiday Grapes (seedless), just cut them in half added them to some apples…delish!!

Now you can make your own pie crust that is great you go to town, but for me this pre-made crust works out perfectly.

This time I had few pears and one lonely apple…but it was delicious and this how I do it.

Ingredients

pic 2

I roll the pie crust out on my baking sheet and set aside

pic 3

Peeled my fruit (I do not peel plums)

pic 4

Cut the fruit

pic 5

toss in together in a large mixing bowl

pic 6

add flour, brown sugar, cinnamon

pic 7

and toss to coat all the fruit

pic 8

Pile up high in the center of your crust

pic 9

pull up one edge of the crust then continue to go around overlapping crust

pic 10

looks like this

pic 11

make an egg wash, and brush all over crust

pic 12

pic 13

I sometime will sprinkle a little sugar over the crust, then bake

pic 14

Done!!!!

pic 15

Recipe

Rustic Fruit Tart

1 pie crust
Fruit (i used) 4 pears and 1 small apple
1/2 cup packed brown sugar
1 tsp. cinnamon
1/4 cup all purpose flour
1 egg
3/4 tsp. granulated sugar (optional)

Pre-heat oven to 425 degrees

Roll out pie crust on to baking sheet, I used a siltpat on my baking sheet.
Peel, core or seed fruit, then slice, put slice fruit in a large mixing bowl, add flour, brown sugar and cinnamon and toss to coat all the fruit.  Pour fruit in the middle of your pie crust and pile it high.  

**I like to use a lot of fruit and pile it high, you can use as much or as little as you want, you like more crust then fruit use less fruit to have more crust coverage, to each his own.

Take one edge flip it up on to fruit then continue to go around the fruit overlapping the crust all the way around.
Egg wash – 1 egg & 1 tsp. water, whisk together and brush to coat crust. (you will not use much, so you can keep for breakfast in the morning)

If you want to add a little more crunch and sweetness to your crust, sprinkle 3/4 tsp of sugar over the crust.

Bake for 25 minutes at 425 degrees, then turn oven down to 400 degrees for 15 minutes more.  It should be nice and golden brown, but everyone’s ovens do vary, so do keep an eye on it.  If you feel your crust is browning to quickly you can tent with some foil until fruit is tender.

pic 16

Serve this warm or at room temperature, most the time when I make it, very little makes it to room temperature, and it does make a tasty breakfast…and goes great with Coffee!!!!  Enjoy

pic 1

This is picture of the Plum tart that I did this past summer.

plum 2

Chocolate and Coffee!! …cookies!!

3 Comments

Chocolate and Coffee what really could be better!!

I really don’t think I could live with out coffee, I just love it, give it to me hot, cold, over ice, in a cup or in can  ———>    pic 1

I just love any kind of coffee drink and will seek out them out even if its International, but I do usually hit my local Starbucks for an Iced Venti 3 splenda Americano.   I also like to spread myself out and give all coffee shops  a fair shot.
I particularly like visiting this one Caribou Coffee shop, these girls that work there are a lot fun.  So when I go there all I ask is for a Medium size with 4 shots, and then tell them to work there magic with whatever they want to make me.
Then once its done, comes the taste test as I try to guess what they made me, well it is really a lot of fun and I’ve never had a bad drink yet.
My last one was  Dark Chocolate syrup with hazelnut, so I thought why not try to make a cookie with the same flavors.

So here is what I came up with and I will call it!!

pic 2

Dark Chocolate Coffee Nut Cookies and it went like this…

Ingredients (plus the nuts, which I forgot in the picture)

pic 3

add butter and 1/2 cup chips to saucepan and melt

pic 4

whisk in espresso powder, set aside

pic 5

add flour, salt, baking powder & cocoa, whisk together, set aside

pic 6

In a large bowl add both sugars, vanilla and eggs, whisk together

pic 7

pour chocolate mixture into sugar/egg mixture, combine

pic 8pic 9

add flour mixture to wet mixture and combine

pic 10pic 11

I took a handful of walnuts, chopped them up and it was 3/4 cup (didn’t have any hazelnuts)

pic 12

add chips and nuts

pic 13

scoop out on baking sheets

pic 14

and here you have cookies…Yummy!!!   pic 15

Recipe

Dark Chocolate Coffee Nut Cookies

Ingredients

1 1/2 tbsp. espresso powder or instant coffee (heaping)
1 1/2 cups semisweet chocolate chips, divided
1/3 cup unsweetened cocoa powder
1 (1/2 cup) stick butter
2 cups all purpose flour
3/4 cup brown sugar, packed
3/4 cup granulated sugar
1/4 tsp salt
1/2 tsp. baking powder
2 tsp. vanilla
2 eggs
3/4 cup chopped walnuts

In a small sauce pan add butter and 1/2 cup chocolate chips, heat over medium heat whisking as they melt, once almost melted remove from heat.  Continue whisking until smooth, then add espresso powder mixing to combine and set aside to cool for about 5 minutes.

In a medium mixing bowl add flour, salt, baking powder and cocoa, set aside.
In a larger mixing bowl add sugars, vanilla and eggs, whisking to combine, then add chocolate mixture, whisking to fully combine.  Stir in Flour mixture all at once, stirring and folding until flour is fully incorporated.  Stir in remaining 1 cup of chocolate chips and walnuts.  I used a medium scoop (1 1/2 tbsp.) for these, baked them at 350 degrees for 11 to 13 minutes, you want them to look a little crackled.

Have them with a nice ice cold glass of milk or like me with more COFFEE!!!!    Enjoy!!!!

pic 16