Soups Around the World!

6 Comments

Last week I had a cooking Event at one of our stores, my sponsor was College Inn Broth.

Plus I wanted to add some seasoning from a local company that is exclusive in our stores, Colonel De’s Seasonings.

So here are the soups that I did and the recipes, I hope you will enjoy and make them 🙂

Irish Garlic Potato Soup
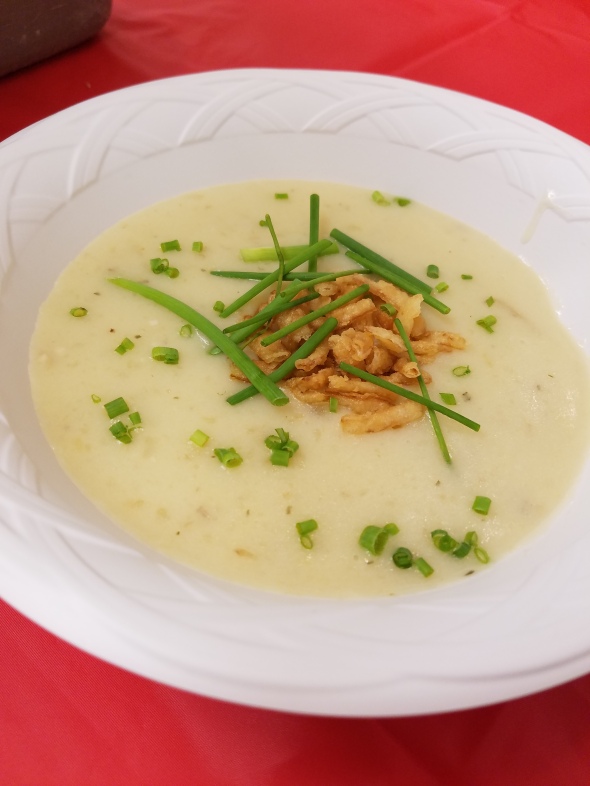
Irish Garlic Potato

Irish Garlic Potato Soup

  • Servings: 6
  • Difficulty: easy
  • Print

2.25 lb. Klondike Goldust Potatoes, sliced
.75 lb. sweet onion, sliced
3 – 14.5 oz. cans College Inn Chicken Broth
2 Tbsp. butter4 tsp. Colonel De’s Garlic Goodness
1 cup half and half
½ tsp. kosher salt or to taste

In stockpot add butter and onions, cook over med-high heat for about 5 minutes.
Add sliced potatoes, onions and chicken broth, cover and bring to a boil. Reduce heat to a simmer, add Garlic Goodness and cook until potatoes are tender.
Remove from heat, with an immersion blender blend until smooth or leave a little chunky.  If using a blender, blend in batches, just make sure the center of the blend lid is removed, place a towel over top of the lid.
Once blended add back to pot, add salt and add half and half, warm on low and serve.
Optional – Add onions straws and chives for a garnish.

Paired with Guiness Draught Beer

Mexican Pozole Soup

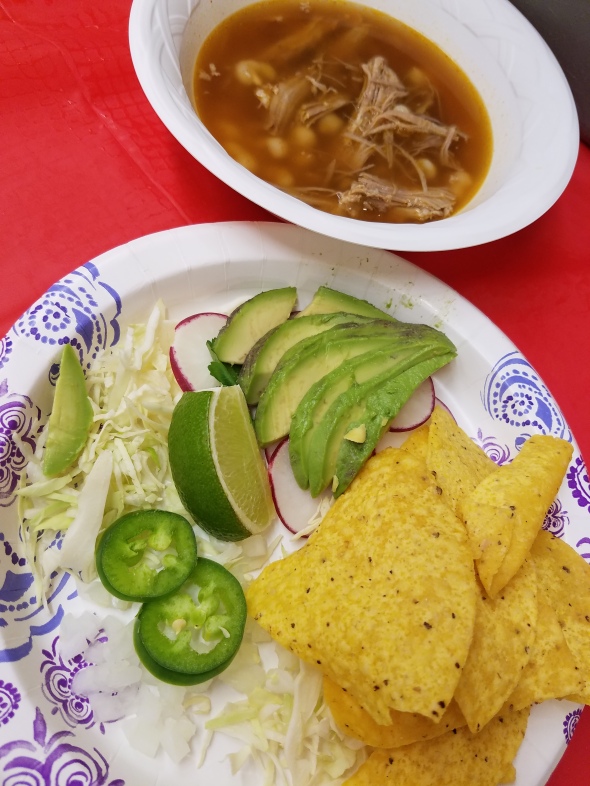
Pozole

Mexican Pozole

  • Servings: 6
  • Difficulty: easy
  • Print

2 – 15.5 oz. cans hominy
3-4 – 14.5 oz. cans College Inn Beef Broth
3-4 cups shredded pork
3 tsp. Colonel De’s Chipotle Seasoning

Add to a large stock pot broth, hominy, pork and seasonings, bring to a boil and serve with garnishes below:

Shredded cabbage
Radish slices
Chopped onion
Chopped hot peppers
Avocado slices
Lime wedges
Tortilla chips
Chopped Cilantro

Paired with Negra Modelo Beer


Avgolemono (Greek Lemon & Chicken Soup)
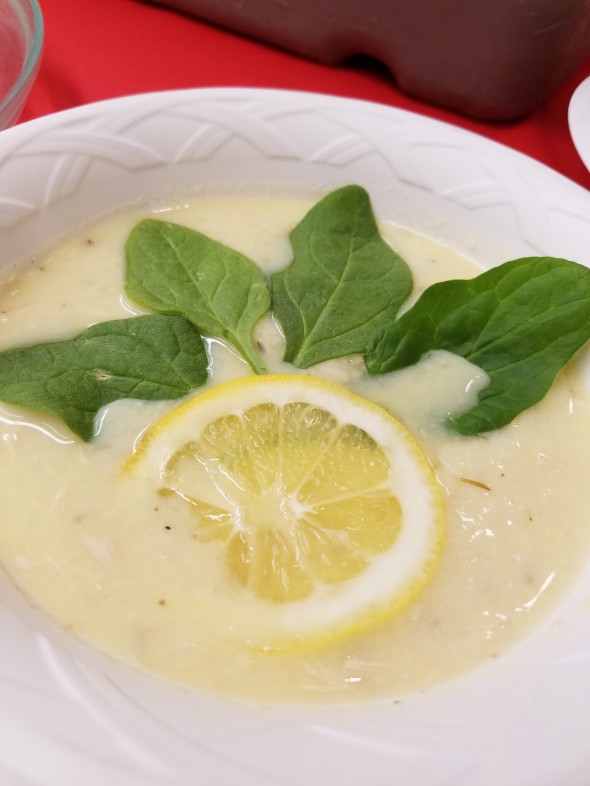
Avgolemono

Avgolemono

  • Servings: 6
  • Difficulty: easy
  • Print

64 oz. College Inn Chicken Broth
Shredded chicken breast from whole chicken
2 tsp. Colonel De’s Greek Seasonings
1 cup instant rice
4 eggs
2 tsp. cornstarch
2 Tbsp. water
¼ – ½ cup lemon juice, per your taste
salt to taste

In a large stock pot over med-high heat bring broth to a boil, covered, then add rice, chicken and seasonings, cover and reduce to low until rice is cooked.
In a medium bowl add water and cornstarch and whisk, then add eggs and beat until completely blended, whisk in lemon juice.  Take 4 cups of the hot soup and slowly add to the egg mixture while whisking constantly so that the mixture will not break.  Stir mixture into the rest of the soup.  Season to taste and serve immediately, garnish each bowl with a lemon slice and a few baby spinach leaves.

Paired with Leffe Beer


Pho Bo (Vietnamese Soup, this picture was taken before broth was added)
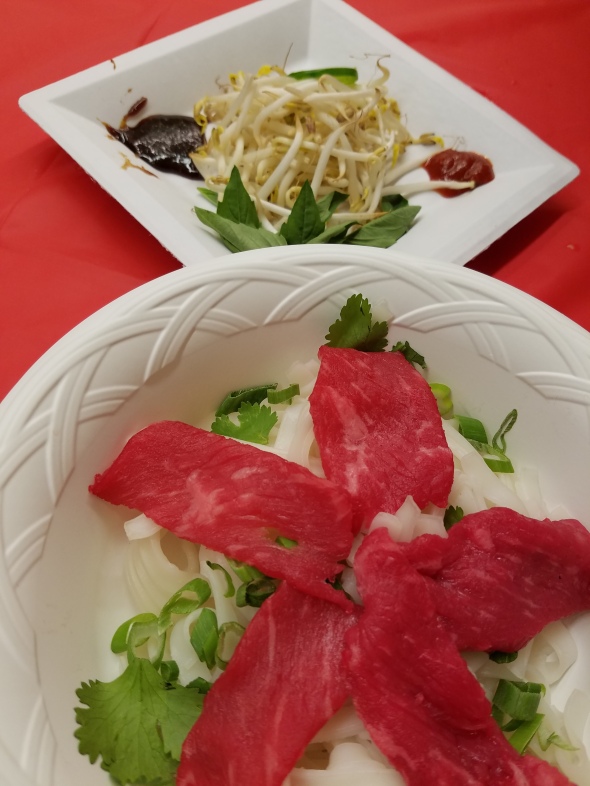
Pho Bo


Pho Bo

  • Servings: 6
  • Difficulty: easy
  • Print

8-10 cups College Inn Beef broth
1 Colonel De’s Pho soup pouch
1 pkg. rice noodles
sirloin steak, trimmed and thinly sliced, kept raw

Green onions, tops thinly slice
fresh cilantro leaves

Add broth and pho pouch to a medium pot and bring to a boil, then let simmer for 3 hours.

Cook rice noodles as directed and drain.  Place portion of noodles in a large individual soup bowls, sprinkle of green onions and cilantro leaves.

Top that with a few thin slices of raw sirloin, set bowls aside.

Make each garnish plate with below

Bean sprouts, Thai basil leaves, hot sliced peppers, some sriracha and hoisin sauce.

Before serving bring broth up to almost a boil, ladle broth in to your bowls.  And add garnishes to your bowl as you wish. 

Paired with Kirin Ichiban Beer

Hope you Enjoy!!!  Cheers – Chef Amy!!

Cooking Salmon & Scallops!!

6 Comments

This week I was at one of our store cooking up seafood in a “Seafood Market” Demonstration I had Salmon, Scallops & Mussels, showing people really how easy it is to cook seafood 🙂

Scallops with the Garlic, Dill & Lemon Marinade

scallops

As I started it was a little slow so I was able to take a couple of pictures 🙂

It was a great weekend Seafood and Wine sample can’t go wrong with that 🙂

First I must share my new duds 🙂 I am going “green” 😛

photo (4)

This picture is the Salmon with the Asian Marinade, you can see a great char on the salmon from the sugar, this added a great smokiness to the salmon, with the hint of soy sauce and ginger.  This salmon was melt in your mouth good!!! 🙂

photo (3)


Salmon with the Garlic, Dill & Lemon Marinade

photo (2)

Seafood Marinades

Asian Marinade

1 lb. salmon fillets
1/4 cup lime juice
1 tsp. fresh ginger, grated
1 tsp. fresh garlic, minced
2 tbsp. brown sugar
3 tbsp. lite soy sauce
1/3 cup light beer
zest of 2 limes

Combine juice, ginger, garlic, soy sauce, sugar, lime zest and beer in zip-loc bag and shake to mix, then add salmon, refrigerate at least 3 hours or up to 8 hours.  Drain liquid and pat dry salmon, brush salmon with a little oil and cook as desired.

Garlic, Dill & Lemon Marinade

1/2 cup oil
1/4 cup fresh dill, minced
4 garlic cloves, minced
1/2 – 1 tsp. kosher salt
1 tsp. ground black pepper
zest of 2 lemons

Add all to a shallow container or zip-loc bag, add your seafood let marinade for 15 – 30 mins.  Then cook as desired, you could just roll your fillets, scallops or shrimp in the marinade then cook immediately.

I hope your try these recipes!!!  And of course in my Planking…blog I could not say enough about the Skuna Bay Salmon and that is what I used again this weekend and it is just so GOOD!!!!  So go buy it, find it!!!  Enjoy!!

Planking????

9 Comments

Do you “Plank”?

Hyde Grilling Demo4

I am talking about cedar planking, using cedar planks for cooking on your grill 🙂

This was another part of my cooking class, using cedar planks and cedar papers.

Cooking on cedar planks is really a lot of fun, instead of me trying to explain this is a great website that will give you all information you will need.

http://www.cedargrilling.com/art.htm

The salmon that I used is Skuna Bay Salmon and if you have never had it you really need to try to find it in your area, we are the only store that carries it in our area.  It’s mild, buttery, fresh and tender, it really is the best salmon I have ever had, check out the website for Skuna Bay Salmon.

Home

Few more picture of the Class, grilling the salmon planks and the delicious out come 🙂

Hyde Grilling Demo5

Hyde Grilling Demo12

Hyde Grilling Demo3

Hyde Grilling Demo7

This marinade is so good, and really easy, you can double it and keep it in your fridge for up to 2 weeks.  It was great on the salmon, but also very good on the Cod, Shrimp and Scallops, very one just loved it.
This also would be great on grilled veggies and slice crusty bread, just brush over the bread then grill the slices…YUM!!!

Garlic, Lemon, Dill Seafood Marinade

  • Difficulty: easy
  • Print

1/2 cup olive oil
4 large cloves garlic, minced
1/4 cup fresh dill, finely chopped
zest of 1 lemon
1 tsp. kosher salt
1 tsp. ground black pepper

1 pound seafood – Fish, Shrimp or Scallops work well

Mix together oil, garlic, dill, lemon zest, salt and pepper, place seafood in a ziploc bag and pour marinade over top and set aside for 15 – 30 minutes.

Cook as you desire.

Also I did cod with roasted red pepper strips and asparagus in the Cedar papers and grilled them.   This marinade would be great on that too, but what I did for the class is just tossed everything in olive oil, salt, pepper and grated fresh garlic…very good as well 🙂

10446712_10154268581270291_5345111232338516512_n Hyde Grilling Demo8 Hyde Grilling Demo11

Bread Pudding

8 Comments

IMG_20130828_123818

Bread Pudding…you either love it or hate it 🙂

I don’t think there is any in between 🙂

I myself like Bread Pudding…if it made well…believe me I had some that I’ve wanted to spit out 😛

But I must say I have had great success making Bread Pudding 🙂

As part of what I do in my job, we host wine dinners, beer dinners, customer appreciation dinners.  One of the dinners that happens each month is a Wine dinner with a local radio station and the morning DJ’s and their winners.  They are Bob and Marianne…Check out photo below…doesn’t he look familiar….think “Entertainment Tonight”

bob_marianne_radio-620x394

Yes Bob Goen…well he is just the nicest person ever!! 🙂

Our dinner for them included the following courses, each with a wine pairing

1st. course – Trio of Crostini’s
2nd. course – Mini cheese Ravioli’s with Apples and Walnuts with a Balsamic glaze
3rd. course – Zen Blend Salad with strawberries, blueberries, goat cheese crumbles, candied walnuts with a Balsamic glaze dressing
4th. course – Parmesan Chicken cutlet, with Whole Wheat Pasta served with Sweet Peppers, Kale  tossed in Arrabiata Sauce
5th. course – Lemon Marmalade Bread Pudding – recipe below 🙂

They loved everything 🙂

Side note****
But today is my Birthday 🙂 and when its your birthday you bring treats into the office and well I made the Lemon Marmalade Bread Pudding along with a Wild Blueberry 🙂


Ingredients

IMG_20130828_101519

Bread

IMG_20130828_101728

Cube it up

IMG_20130828_101929

place on baking sheet

IMG_20130828_102030

bake

IMG_20130828_103232

divide marmalade

IMG_20130828_102818

add butter to saucepan with marmalade

IMG_20130828_103955

stir and melt

IMG_20130828_105955

add mixture to cubed bread in a large bowl

IMG_20130828_110136

toss to coat bread, set aside

IMG_20130828_110157

add half and half to marmalade jar

IMG_20130828_103405IMG_20130828_103439

Shake

IMG_20130828_103550

add jar mixture, rest of the half and half, sugar, eggs, egg yolks, vanilla (lemon juice & zest)

IMG_20130828_105552

whisk together

IMG_20130828_105839

pour custard over bread cubes

IMG_20130828_110300

mix together, set aside for 30 minutes

IMG_20130828_110404

Spray ramekins

IMG_20130828_113516

add bread-custard mixture, place on baking sheet, bake

IMG_20130828_114008

IMG_20130828_114030

after baking

IMG_20130828_122544

top each ramekin with the remaining marmalade

IMG_20130828_122731

Recipe – Lemon and Wild Blueberry Bread Pudding

12 oz. package of King’s Hawaiian Rolls, bread, sub rolls, buns…it all works 🙂
1 quart Half and Half
1 cup granulated sugar
2 whole eggs
2 egg yolks
1 tsp. vanilla
2 tbsp. butter

For Lemon – zest and juice of 1 large lemon
                         1 jar Lemon Marmalade 12.35 oz – 14 oz. 

For Wild Blueberry – 1 cup frozen or fresh blueberries 12.35 oz. – 14 oz.
                                        1 jar Wild Berry or Blueberry preserves

Cut bread into 1 inch cubes, toast on baking sheet in oven at 350 degrees, until golden brown about 10 minutes or so, let cool, once cooled add cubes to large mixing bowl, set aside.

Remove a 1/4 cup of the marmalade and set aside, take the rest of the marmalade and add to a small sauce pan with the butter, on medium heat, warm marmalade and melt butter, stirring to combine.

Once butter has melted, pour mixture over top the toasted bread cubes and toss to coat, set aside.

Take empty marmalade jar and add 1/2 cup of the half and half, shake vigorously to loosen any thing left to the sides of the jar.   In a medium bowl add that mixture, the rest of the half and half, sugar, vanilla, eggs and egg yolks, whisk to fully combine.  

(If making Lemon at this point add zest and juice to the wet mixture whisking to combine)

Pour custard mixture over the coated bread cubes, mixing together, let stand for 30 minutes, pushing bread cubes down into the custard occasionally. 

After 30 minutes, pre-heat oven to 325 degrees

Distribute the bread-custard mixture into buttered or sprayed ramekins, I used 10 8 oz. ramekins filling them about 2/3 the way full.  

(If making Wild Blueberry, top each ramekin with a little of the blueberries)

Place on a baking sheet and bake for about 40 minutes, remove from oven and and using the set aside marmalade spoon over top each ramekin.  Bake for an additional 5 minutes.

IMG_20130828_171530

Serve and Enjoy!!!

IMG_20130828_171622IMG_20130828_171722

Limoncello……………….Part Two!!!

Leave a comment

Okay everyone its been 42 days!!!  Hello old friend 🙂

IMG_20130425_140710

It is turning yellow and I can’t wait to move on to

Part Three…Drinking it 🙂

If you missed Part One you can click here

http://whatscookingwithchefamy.com/2013/03/18/ciao-bella-limoncello/

So let move to Part Two

I added my sugar to my pan with water

IMG_20130425_140851

over medium heat and stirred until sugar was dissolved 

IMG_20130425_140956

once dissolved I let cook for 1 – 2 minutes

IMG_20130425_141224

remove from heat and let cool completely

IMG_20130425_165018

once cooled add to your jar, give a shake

IMG_20130425_165059

IMG_20130425_165130

Recipe Part Two

1 cup sugar
1 1/2 cup water

add sugar and water to sauce pan, heat and dissolve over medium heat, once sugar has dissolved cook for 1 -2 minutes more.  Remove from heat let sugar water cool completely.  Then add to jar, give a shake and put it back in a dark cool spot for another 42 days…every week or so give the jar a shake.

Goodbye Old Friend see you in 42 😉

IMG_20130425_165311

Ciao Bella…..Limoncello

8 Comments

cover Limoncello is simply delicious, and I’ve always wanted to make it, but it does take some time and you must be patient.

FYI – below was taken straight from Wikipedia

Limoncello (Italian pronunciation: [limonˈtʃɛllo]) is an Italian lemon liqueur mainly produced in Southern Italy, especially in the region around the Gulf of Naples, the Sorrentine Peninsula and the coast of Amalfi and islands of Procida, Ischia and Capri. It is also produced in Sicily, Sardinia, Menton in France, and the Maltese island of Gozo. Though there is debate about the exact origin of the drink, it is at least one hundred years old.

Traditionally, it is made from the zest of Femminello St. Teresa lemons, also known as Sorrento lemons or Sfusato Lemons. Lemon zest, or peels without the pith, are steeped in grain alcohol until the oil is released. The resulting yellow liquid is then mixed with simple syrup. Clarity and viscosity are affected by factors like the relative temperatures of the two liquids. Most lemons, including the more-common Eureka lemon, will produce satisfactory limoncello

Limoncello is traditionally served chilled as an after-dinner digestivo. Along the Amalfi Coast, it is usually served in small ceramic glasses themselves often chilled, the Amalfi coast being a center of both ceramics and limoncello production. This tradition has been carried into other parts of Italy.

Limoncello is the second most popular liqueur in Italy but has recently become popular in other parts of the world. Restaurants in the United States, Canada, the United Kingdom, Australia, and New Zealand are increasingly offering limoncello on their beverage and dessert menus. In the United States commercial producers using California lemons have introduced USA made limoncello, including Rometti Limoncello, Ventura Limoncello, and Fabrizia Limoncello. Limoncello is an increasingly popular ingredient in cocktails. Limoncello imparts a strong lemon flavor without the sourness or bitterness of lemon juice.

Okay let’s get making this good stuff!!!

 There are so many recipes out there for Limoncello, using Everclear, vodka, a lot of sugar a little sugar, steep for 7 days, steep for 21 days, steep for 45 days.  

This is the way I did it, first I choose to let steep for 42 days, so part two coming in 42 days, then part three coming in another 42 days.
I used 10 lemons, and I used “Potato Vodka” 80 proof…yes I know its better with Everclear or Vodka that’s 160 proof, but I have been wanting to drink “Potato Vodka” for awhile now so instead I decided to make my Limoncello out it.

Now part two will be adding the simple syrup, then letting steep for another 42 days…so I figure on April 25th will be the post date for part two and then part three post and drinking day should be on June 7th.  Ahhhh just in time to start the summer, I can already picture me sitting on my back deck, at dusk, listening to the fountain that runs in my little pond, maybe having some friends over for the 84 day celebration to sip on my first batch of Limoncello!!

Wait 84 days!!!!!  to make one batch…maybe I will start another batch in April, then another in May…just so I have enough to last the summer and if its good!! Well I might have a batch making party monthly!!!!  We will see!!

This is what you will need to the process

pic 1

wash the lemons!!!

cover

peel your lemons, only the yellow part, try not to get the white pith part the best you can
I found out that the fresher your lemons are the easier they are to peel, so try to look for nice bright firm lemons.

pic 2

put peels into a glass jar that can seal tightly

pic 3

filter the alcohol, now you don’t have too, but some people do, its a debate all around whether to do this or not, most say to use a brita filter, but I didn’t have one so I used a coffee filter…will I filter next time…NO

pic 4pic 5

make sure all the peels are covered by the alcohol

pic 6

seal tightly and put in a dark cool place, every few days or once a week give your jar a swish

pic 7

Now what to do with all those lemons…juice them and make Fresh Lemonade!!!

pic 8

Or you can pour the juice into ice cube trays and freeze, then once frozen put cubes in a ziploc bag and now you have fresh lemon juice when you need it for a recipe.

Okay “Part Two” Limoncello in 42 days!!

Recipe

Part One

750 ml  pure grain alcohol (like everclear or 150 proof vodka)
I used 80 proof Potato Vodka, next time I will try it with a higher proof
10 firm lemons
1 large with a tight lid (i used a half gallon Ball canning jar)

Part Two in 42 days

1 cup sugar
1 1/2 cup water

Wash lemons with vegetable wash or soap…I did
then peel the zest of the lemons, you only want the yellow part, do you best not to get the white pith part or at lest very much of it.
Put peels in the jar, and pour your alcohol over top of the peels making sure all are covered.  You can use a coffee filter and strainer to pour the alcohol through as I did, next time I will not do this process.  I will just pour it straight in the jar.

Store the jar in a dark cool spot, and every few days give a swish until Day 42.

On Day 42 in a small sauce pan add  sugar and water, cook over medium heat, stirring until sugar is dissolved  once dissolved let cook for one more minute then remove from and a cool completely.  Once mixture has cooled pour into jar with the peels and alcohol and stir.  Then put it back into that cool dark spot for another 42 days.
When day comes, strain (to catch peels) jar contents into a pitcher, then using a funnel pour liquid into decorative bottles or bottle, you can give them out as gifts if you want, or like me I’ll be keeping my “Liquid Gold”.
Whatever you keep store it in the freezer, that is how you want to serve it, ice cold in small glasses just for sipping.  

Let me know when you start your own batch!!  Enjoy!!!