Happy Halloween 2016!!

8 Comments

Well Happy Halloween everyone!!!Ā 

Yes I know I have not blogged in FOREVER!! But this girl has been busy, but today
I have a quick easy recipe for Halloween or really anytime. šŸ™‚

I do like a Butterfinger Candy Bar every once in awhile, so when I saw this online, I thought really does it taste like a Butterfinger????

This was one of those million some videos you see of recipes, and I was like 3 ingredients and you have a Butterfinger…well lets give this a try šŸ˜› Ā LOL!!

pic-10

Now I made a big batch, I wanted to bring them to the office today for everyone for Halloween.Ā 

So I will give you the original recipe and then tell you what I did for large batch.

So you need – Chocolate discs for melting, Creamy Peanut Butter and a bag of Candy Corn…

Now you know tomorrow you will find a ton of bags of Candy Corn marked down to like 25 cents…LOL
So stock up and you can make this anytime šŸ™‚

Melt Chocolate, spread on to a silpat or parchment paper

pic-1

In a microwave safe bowl add peanut butter and candy corn

pic-2Ā 

Heat in microwave until softened, then mix until smooth
and candy corn has been melted and mixed in

pic-3

Once Chocolate layer is firm, layer candy corn mixture over top

pic-4

Spread mixture over chocolate to the edge

pic-5

Melt more chocolate

pic-6

Spread it over top all the way over the edge

pic-7

Like this, now let it set up, I let mine set on the counter

pic-8

Now Cut and there you have your bars,Ā 
you also can free form bar shapes and then dip
the whole bar into chocolate

pic-9

Homemade Butterfinger Bars

The original recipe is not mine, just google it and you will find a lot of them.

1 cup candy corn
1/2 cup creamy peanut butter
2 cups chocolate discs

Melt half the chocolate and spread out onto a silpat or parchment paper, set aside to cool

In a microwave safe bowl add candy corn, heat for 30 seconds and keep repeating until smooth,Ā then add peanut butter, mixture will become stiff.
Let cool a little, then spread over top of chocolate, then melt remaining chocolate and spread over top of candy corn mixture, let set then cut into bars.

What I did was a little different, and this is that recipe, this was a large batch

4 cups candy corn
1 jar 16.3 oz. peanut butter
1 lb. milk chocolate disc, dividedĀ 
1 lb. semi-sweet chocolate disc, divided

I used a silpat for this and made it over the entire thing

To a microwave safe bowl add half the milk chocolate and half the semi-sweet, I also like to add a tablespoon of Crisco shortening to my chocolate to make smoother. Ā Heat for 1 minute, stir, then heat again in 20 secondsĀ intervals, stirring each time until smooth.

Pour out all over the silpat, let set to cool, once cool, then in a large microwave safe bowl add candy and peanut butter. I added some peanut butter first then some candy, then peanut butter again then candy then peanut butter again.

Heat for 1 minute, stir, then heat for 1 minute and 30 seconds, stir again, then heat in 20-30 second intervals until candy corn is completely combined into the mixture. Ā 

TIP – take the candy corn and add it to your food processor to chop up, I think doing this will help in melting easier and then it will not take that long in the microwave.

Let candy corn mixture cool just a bit, then spread it over the cooled chocolate, spreading it to the chocolates edge.

Now melt the same way as the first, the remaining chocolate and pour over top the candy mixture.

Let set up at room temp for at least 6 hours, if you can’t wait you can put it in the fridge to firm, but let it get to room temp before cutting or chocolate could crack.

Cut into any size bar you want…and Enjoy!!!

pic-10

Happy Pi Day! 3-14

8 Comments

Happy Pi Day Everyone!!! 3-14-16

pi_day_2016_7_inch_paper_plate-r174a958c4e6c40ea8570f6e17a40e72d_z6cf8_512

In honor of Pi Day here is a link to my Banana Cream Pie!!! Ā I hope you check it out and what Pie will you be eating today!! LOL!! šŸ™‚

https://whatscookingwithchefamy.com/2012/06/17/banana-cream-pie-for-fathers-day/

Apple Banana pie 012

National Chocolate Cake Day!!!

18 Comments

So yesterday was National Chocolate Cake Day, and I got the itch to make a
Chocolate Cake and I brought it in for the office today!!! Ā 

IMG_4105

I know they will happy, since this is the second thing I made this week, on Monday
I made a Cinnamon and Walnut Coffee Cake and they all loved that!! šŸ™‚

So I didn’t have my usual ingredients at the house that I have used in my Chocolate cakes before, like
buttermilk or sour cream those things make my cakes moist and I like using them.

So I just followed the recipe on the back of the Hershey’s Cocoa Powder can.

IMG_4078

The only thing I did differently was two things:
1. I used 1 cup of cocoa powder, instead of what it said, (I can’t remember LOL)
2. I used Hot Strong Coffee instead of Hot Water.

I also made it in a bundt pan šŸ™‚ Bake for about 40-50 mins, just until a toothpick is inserted and comes out clean.

The I made Cream Cheese Frosting and that recipe is below šŸ™‚

Adding the chocolate to the cream cheese, butter and sugar (sorry i didn’t take better pictures)

IMG_4096

whipped up altogether šŸ™‚

IMG_4097

frosting!!

IMG_4098

Done šŸ™‚

IMG_4104

now Enjoy!!!

IMG_4110

Chocolate Cream Cheese Frosting

2 – 8 oz. packages of cream cheese, softened
2 stick of butter, softened
1 3/4 – 2 cups powdered sugar
3 oz. unsweetened chocolate
3 oz. bittersweet chocolate
1/4 cup half and half

In a double boiler add chocolate and half and half, stir until chocolate has melted and mixture has before like a thick paste. Ā Remove from heat and set aside for 10 minutes.

In a large bowl mix cream cheese until fluffy, then add butter and mix until combined and fluffy.
Then add powdered sugar, I only used 1 3/4 cup but if you like it sweeter add more, mix until combined.

The mix in chocolate and continue to mix until all in combined and fluffy.

This recipe covered the bundt cake and I had about 2 cups left over.

Store cake in the refrigerator, let set at room temperature for at least 1 hour before serving.

YUMMY!!! Enjoy!!

IMG_4111

Homemade Pumpkin Spice Creamer!!

19 Comments

So are you one of those people that CANNOT wait till fall hits so you can get your
Pumpkin Spice Latte on!! šŸ˜›

IMG_3347

As you know most of the coffee shops only have this Pumpkin Spice Syrup during the fall and maybe into the winter???

I don’t know because I am not one of those people šŸ˜›

But it doesn’t mean I don’t want to get on the “Band Wagon” and make my own…LOL!!

So many recipes have been flying around the internet, so I decided I would give it a try…

And let me tell you it turned out DELICIOUS!!!!!!!

I kind of shock myself…LOL šŸ˜›

So of course I dug into my spices to find the hidden Pumpkin Pie Spice in the back from the fall before LOL and finally can open one of the two large can of pumpkin pure, again from the fall before šŸ˜¦

Okay so what else…I found some sweetened condensed milk and now I just needed cream, but I didn’t want to use cream, so I settled for half n half.

Okay I think I am ready to go and this is how it all went.

Ingredients

IMG_3315

in a saucepan, pumpkin, milk and spice

IMG_3317

stir that up, then stir in the half n half

IMG_3319

cook on med-high
okay I will confess, I had in on med-high, but I was trying to do other things as well, and I may not have been stirring it the whole time…hence it started to burn on the bottom, when I went back to it, and started whisking like a mad women, black bits started to surface. Ā I may have cursed that this time, but I turned it down to low and kept on whisking until it thickened a little, then I let it cool for 5 minutes

Once I tried it was AWESOME!! It tasted like Toasted Pumpkin Marshmallow šŸ™‚
I thought Holy Crap I just added another flavor dimension…WOOO HOOOO!!!!! LOL šŸ™‚

IMG_3322

It does get a little darker as it thickens

IMG_3321

now you have strain this through a fine mesh strainer,
and take the back of a spatula and force the mixture through the
strainer by moving the spatula back and forth

IMG_3323

IMG_3324

IMG_3325

this is what you will have left in the strainer

IMG_3326

after I let the mixture cool in the fridge,
I poured it into 2 little mason jars

IMG_3335

IMG_3336

This will keep in your fridge up to 2 weeks
if it last that long šŸ™‚ LOL

IMG_3337

My Pumpkin Spice Cappuccino

IMG_3338

I added to my mug, about 2 Tbsp. pumpkin mixture
2 Tbsp. creamer and stir it up

IMG_3339

Then I frothed that

IMG_3340

IMG_3342

Then I add my espresso

IMG_3344

IMG_3345

and to finish it off I sprinkle a little
Pumpkin Pie Spice on top…it was just Yumm!!!

IMG_3346

Now you can just mix it into your regular coffee,
as I did at the office this morning šŸ™‚

IMG_3349

IMG_3351

IMG_3352

As I talk to some of the ladies this morning, I started coming up
all kinds ideas to do with this mixture besides to put in your
coffee…oh a can wait to get back in the kitchen…stay tune!!!

IMG_3347

Homemade Pumpkin Spice Creamer

  • Difficulty: easy
  • Print

1 cup pure pumpkin puree
1 can sweetened condensed milk
1 1/2 tsp. pumpkin pie spice
1/2 cup half n’ half, or cream or whole milk

Whisk everything together in a saucepan, cook over med-high, whisk until mixture thickens
and darkens a little. Ā Like I said above, let it burn a little and it will give it a toasted flavored, I felt
like that added such good flavor.

Pour mixture through a fine mesh strainer, take a spatula and force mixture through the strainer by going back and forth. Ā Pour mixture into a jar or container and keep refrigerated for up to two weeks if it last that long…LOL Ā Mind didn’t šŸ˜›

Add as much or as little to your coffee or tea and sit back and enjoy!!

Ā 

It Was An All-Star Week!!!!

17 Comments

Well if you are not a sports fan and don’t live in Cincinnati, then you may not even know what I am talking about šŸ™‚ but for a year the city has been planning for Major League Baseball’s All-Star Game.

IMG_2742

Let me say the city was crazy, I did go downtown a couple of days but if you didn’t get down there early to find a parking space, lot or garage it was nuts. Ā So to say the least I just drove around and then went back across the river šŸ˜›

But the Home Run Derby was exciting since Todd Frazier of the Cincinnati Reds won it this year!!!

CINCINNATI, OH - JULY 13:  National League All-Star Todd Frazier #21 of the Cincinnati Reds celebrates with teammate National League All-Star Aroldis Chapman #54 of the Cincinnati Reds after winning the Gillette Home Run Derby presented by Head & Shoulders at the Great American Ball Park on July 13, 2015 in Cincinnati, Ohio.  (Photo by Rob Carr/Getty Images) ORG XMIT: 554358169 ORIG FILE ID: 480626732

CINCINNATI, OH - JULY 13:  National League All-Star Todd Frazier #21 of the Cincinnati Reds celebrates with the trophy after winning the Gillette Home Run Derby presented by Head & Shoulders at the Great American Ball Park on July 13, 2015 in Cincinnati, Ohio.  (Photo by Rob Carr/Getty Images)

635724332307380677-071315-hrderby-ke-2156

All and all I think Cincinnati and Northern Ky. did an outstanding job hosting this years All-Star Game.

I did take some pictures, I have some here that friends took as well, but as I say it was an “All-Star Week”

There were are couple birthdays in our family and of course I made a few things, so check out my pictures and enjoy!!!

First of the birthdays was my little niece I made cupcakes šŸ™‚

IMG_2673

IMG_2674

IMG_2675

She likes presents and bubbles šŸ™‚

IMG_2680

IMG_2691

IMG_2693

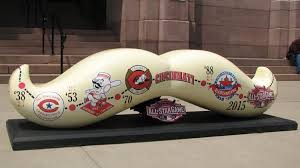
Around town they made these mustaches statues here are few of them

IMG_2738

IMG_2636

download

here is the picture of all of them that they made, pretty cool šŸ™‚
All-StarStacheStatues

Here are few of my souvenirs

IMG_2739

Buskin Bakery made the cookies got to love that!!

IMG_2740

Here are some pictures of the Red Carpet Parade,
the players start at their hotel and end at the ball park, all on red carpet šŸ™‚
Grand Marshall – Barry Larkin

IMG_2726


Mr. Red and Gapper

IMG_2723IMG_2724


Rosie Red

IMG_2730


Some other mascots

IMG_2729

IMG_2728

IMG_2731

Todd Frazier and his family

IMG_2721

IMG_2725


You can see on Todd’s hand the blisters from the Home Run Derby šŸ™‚

IMG_2727


Few other Players šŸ™‚

IMG_2737

IMG_2733

IMG_2734

IMG_2735

IMG_2736

Some of the city skyline and downtown

WCPO_Scripps_Mustache_All-Star_1434036512226_19645178_ver1.0_900_675

IMG_2644

IMG_2699

yes they had a zipline too

IMG_2700


My All-Star Pizza, half spinach & garlic
other half was spinach, Gorgonzola cheese,
sliced almonds, sliced strawberries and
balsamic glaze…so so GOOD!!!

IMG_2701


IMG_2705

IMG_2707

The other birthday was my Mommy!! šŸ™‚

I made her cookies peanut butter with no flour šŸ™‚

IMG_2744 IMG_2743

Dinner – Braised Short Ribs, butter noodles and carrots šŸ™‚

IMG_2745

IMG_2750

IMG_2752

Peach Ice Cream (I just scooped some out to take the picture)
she took the Ice Cream, cookies all home šŸ™‚

IMG_2747

IMG_2749

And for actual dessert I made Red Velvet Cake with Cream Cheese Frosting šŸ˜›

IMG_2720

IMG_2754

IMG_2753

I must say I agree is was an All-Star Week šŸ™‚

IMG_2709

Summer Cooking Class Series!!

16 Comments

Yes I know I have been a little “MIA” lately!!!

But this summer has been busy and I can’t believe its JULY!!!!Ā 
I have my hand in so many different little things that I am just so busy and it’s been hard to find the time to blog. Ā Plus I have not been cooking anything really good for myself, so hence no blogs.

But I did finish a couple weeks ago a cooking class series that I did in 3 of our stores šŸ™‚

They all turned out great, a lot of grilling and a few out of the box recipes, beer sampling with one too!!

Here are a few pictures of the dishes and the crowds, it was a great time and I had a LOT of help from some of GREAT co-workers.

I hope you enjoy!!!

Grilled Fruit Pizza – naan bread, Camembert cheese, blackberries, strawberries, basil and balsamic glaze

FullSizeRender (0000000D) FullSizeRender (00000008) FullSizeRender (00000004)

Grilled Asian Corn with peanuts

FullSizeRender (0000000E)

Grilled Watermelon with arugula, feta and balsamic glaze

FullSizeRender (00000012)

Crowd pic

FullSizeRender (00000003)

FullSizeRender (00000002)

FullSizeRender (00000005)

Veggie Pizza – Garlic naan bread, red pepper hummus, grilled veggies topped with goat cheese

FullSizeRender (0000000B) FullSizeRender (00000007)

Grilled pound cake and pineapple

FullSizeRender (0000000A)

Grilled German Potato Salad

IMG_2585

Grilled veggies with garlic couscous topped with basil

IMG_2586

crowd pics

FullSizeRender (00000009) FullSizeRender (00000016)

Zucchini & tomato salad with ricotta, Parmesan and pesto

IMG_2581

Hawaiian Rice – cooked in coconut milk, golden raisin, macadamia nuts and green onions

FullSizeRender (0000000C) FullSizeRender (00000019)

Mango & pineapple salsa

FullSizeRender (00000013)

Crowd Pics

IMG_2588

IMG_2576

Grilled romaine with mango vinaigrette, shredded jicama, pineapple, red pepper and black sesame seeds

FullSizeRender (00000010)

Me – having fun with the microphone….I love being on the Microphone šŸ˜›Ā 

Chef Amy

One Lovely Blog Award!!

10 Comments

Recently I wasĀ nominatedĀ for the “One Lovely Blog Award” by Ka@My Uni Kitchen

One-Lovely-Blog-Award-1
Ka has a terffic blog, he has amazing Recipes, How to Guides and Cooking Tips, so please go over to his
blog and check out all those good things he has to offer šŸ™‚

There are few rules to accepting the award you must tell everyone 7 things about yourself and nominate 15 blogs
for the award.

So here we go šŸ™‚

1. I worked on a cruise ship for 6 1/2 years

2. My first career was in Theater Costuming before going into Culinary

4. I love Hockey

5. I worked for our home town Hockey Team by sewing names and numbers on their jerseys

6. Ā During the baseball season, I am on call for the Cincinnati Reds and the away teams
Ā  Ā  Ā  that come into town and play the Reds, to sew their uniforms (sewing names & numbers),
Ā  Ā  Ā  for any last minute call ups.

7. Ā The most I was ever paid for sewing 1 single uniform for an away team was $100.00
andĀ 
that was for 1 hour of work, that included the call, me driving to the ball park
(i live very close)Ā 
getting in there sewing the name and number and thenĀ 
Ā  Ā  Ā  back in my car. Ā šŸ™‚ Ā 

Bonus – here’s the picture šŸ™‚

beliveau

I hope you enjoyed the few things that most of you did not know about me šŸ™‚


Here are the blogs that I think are fantastic and I give the “One Lovely Blog Award” too

Suzanne@apuginthekitchen

Gretchen@Feeding My 3 Sons

Ginger@Ginger&Bread

Loretta@Safari of the Mind

Angie@The Novice Gardner

Julie@Hostess At Heart

Michelle@Giraffes Can Bake

Suzi@Beach Blanket Bacon

Jhuls@The Not So Creative Cook

Coco@Crafty Little Coco

Lili@Lili’s Cakes

Max@Dante’s Kitchen

Linda@La Petite Paniere

Ms. Frau@Frugal Hausfrau

Petra@Food Eat Love

Vidya and Chitra I added you as well
I know Ka added you to his blog
but I wanted to let you know I love
your blogs too, so you can consider mine
with his šŸ™‚

Vidya@Traditionally Modern Food

Chitra@Chitra’s Healthy Kitchen

Thank you everyone for checking out my blog!!!


Red Velvet Cheesecake!!! “Fiesta Friday #63”

25 Comments

“Red Velvet, Red Velvet, send “Cheesecake” right over” LOL

Anyone remember playing “Red Rover, Red Rover” as a kid šŸ˜‰ if not just google it LOL šŸ˜›

Anyway I was trying to start my blog out in a silly kind of way, but there is no silliness when “Red Velvet” is involved šŸ˜‰

Of course Red Velvet everything starts to come out around Valentine’s Day, and this is around that time I made this delicious cheesecake.

Of course I did share with several friends and I must say I had “zero” complaints šŸ™‚ LOL

So I thought this would be perfect for this week’s “Fiesta Friday #63”, of course our host is Angie@The Novice Gardener her new blog for Fiesta Friday’s is here and her co-host this week are Julianna@Food On Board and Hilda@Along The Grapevine.

So I’d like to thank them for letting me share this recipe šŸ™‚

So without further ado here you go!!

FullSizeRender (2)


Ingredients

IMG_1873

Crust –

place biscuits in food processor

Ā 

IMG_1875

Ā 

Pulse until it becomes fine crumbs

IMG_1876

this is the 1 1/2 cup of the tea biscuits

IMG_1877

Ā 

Add melted butter and crumbs together

Ā 

IMG_1879

Ā 

butter & crumb mixture

Ā 

IMG_1881

Ā 

spray your spring-form pan

IMG_1882

Pour crumb mixture into pan

IMG_1883

with your fingers firmly press crumb mixture into pan
and up the sides about 1 inch

IMG_1884

Filling – cream cheese softened

IMG_1885

Ā 

blend the cream cheese until smooth

IMG_1886

Ā 

add eggs one at a time, blending well after each one

IMG_1887

IMG_1889

Ā 

add the sugar

IMG_1891

Ā 

add sour cream

IMG_1892

Ā 

add salt & cornstarch

Ā 

IMG_1893

add vanilla

IMG_1894

scrap your bowl

IMG_1896

put about 2 1/2 cup of the filling in another bowl

IMG_1897

add red food coloring and cocoa

IMG_1898

Ā 

whisk together

IMG_1899

Pour red mixture on top of cream mixture
and give it a swirl and bake

IMG_1901

Ā 

once its done turn oven off, crack the oven door open
and let cake sit inside for 1 hour

IMG_1951

Ā 

remove from oven and let cool for 3 hours

IMG_1973

Ā 

Chill overnight or for at least 3 hours before
cutting and serving

IMG_1979

IMG_1980

FullSizeRender

Ā 

Its came out just delicious!!!

FullSizeRender (8)

Enjoy!!

Red Velvet Cheesecake

  • Servings: 8-10
  • Difficulty: easy
  • Print

Crust:
2 1/2 cups cookie crumbs (graham or flavored)
(I used 1 1/2 cups Cappuccino tea biscuits and 1 cup graham cracker crumbs)
6 Tbsp. butter, melted
1/4 cup sugar

Mix all together in a bowl, in a 9 inch spring-form pan press mixture down on the bottom and up the sides about 1 inch, set aside.

Filling:

2 8oz. bricks cream cheese, softened
1/2 cup sour cream, room temp
3 eggs, room temp
3/4 cup sugar
1/4 tsp. salt
1 Tbsp. corn starch
1 tsp. vanilla
1 tsp. red food coloring
1/4 cup cocoa powder

In a large bowl with a stand mixer or hand mixer, mix the cream cheese until smooth and creamy, add one egg at a time, making sure each is mixed in before adding the next. Ā Then add the sugar, sour cream, vanilla, salt and then cornstarch, scraping the bowl as needed.

Take 2 1/2 cups of the mixture and add it to a small bowl then mix in food coloring Ā and cocoa until fully combined.

Pour white mixture into the pan and spread around, then add red mixture and just swirl the 2 mixtures together.

Bake at 350 degrees for 45-60 minutes, edges will be puffed up and slightly brown, turn off oven, leave the door cracked with cheesecake inside for 1 hour. Ā Then cool at room temp. for about 3 hours, place in refrigerator to chill for at least 2-3 before serving.

FullSizeRender (6)

fiesta-friday-badge-button-i-party

Royal Chocolate Biscuit Cake!! Fiesta Friday #58

32 Comments

Welcome to Fiesta Friday #58!!

I want to thank Angie@The Novice Gardener and her co-host for this week areĀ Caroline @Carolineā€™s Cooking andĀ Elaine @foodbodĀ šŸ™‚

I would like to share my “Royal Chocolate Biscuit Cake”

IMG_2090

This past weekend in the states was the final episode of Downton Abbey Season 5!

My friend Paul and I decided to get together and watch it together and have a little Downton Abbey Dinner. Ā He bought the Downton Abbey Cookbook so we picked out a couple of recipes to make.

We made Crawley Family Chicken Breasts with Caper Cream Sauce, Lord Grantham’s American Italian: Risotto alla Milanese and Roasted Asparagus with Parmesan.

Of course we had some cocktails too I made “Huckleberry Clover Club’s” Ā a few pictures of the night šŸ™‚

Oh and Downton Abbey did not disappoint it was just wonderful with happy endings, I cried of course šŸ˜›

Our table šŸ™‚

IMG_2102


Huckleberry Clover Club


IMG_2097

IMG_2099


IMG_2100

Our dinner

IMG_2103

IMG_2104

IMG_2093

I knew the dessert had to be special and for our love of Prince William, I decided to make Prince William’s Grooms Cake, this was his favorite cake growing up.

I saw Carolyn Robb the former chef for the British royal family make this on Good Morning America in December and I was like I have to make that sometime for some occasion.

This was the perfect occasion to make it, here is the original recipe, but this is what I did I changed it slightly.

Ingredients

IMG_2047

Butter in the pan

IMG_2051

golden syrup added

IMG_2054

Melted all together

IMG_2059

the chocolate, vanilla and cocoa

IMG_2052


add the chocolate

IMG_2060

the vanilla

IMG_2061

now the cocoa

IMG_2062

whisk until silky smooth

IMG_2064

biscuits ready

IMG_2056

pistachios and figs

IMG_2057

Mix those together

IMG_2058

pour in chocolate mixture

IMG_2065

mix all together

IMG_2066

my pan

IMG_2050


pour into pan and cool

IMG_2068IMG_2067

rack

IMG_2075


now chilled

IMG_2076

place upside on rack

IMG_2077


melt chocolate with crisco

IMG_2073IMG_2078

pour on top of cake

IMG_2079

spread all over

IMG_2080IMG_2081

cake comb

IMG_2082

IMG_2083

melt white chocolate with criso (blurry)

IMG_2084

IMG_2085

drizzle over cake

IMG_2086

add maltesers

IMG_2087

IMG_2088

IMG_2092

Enjoy!!

Royal Chocolate Biscuit Cake

  • Servings: 10-12
  • Difficulty: easy
  • Print

3 sticks unsalted butter
3/4 cup golden syrup
2/3 cup unsweetened cocoa powder
2/3 cup cup semi-sweet chocolate
1 teaspoon pure vanilla extract
1/2 cup shelled pistachios
1/2 cup packed soft, plump dried figs, diced
1 pound digestive biscuits, each biscuit broken into 4 pieces
To Decorate:
1 1/2 cups semi-sweet chocolate
3 Tbsp. white chocolate
1 1/2 Tbsp. crisco & 1 tsp. crisco
small bag of ‘Maltesers’ or ‘Whoppers’

Melt the butter with the golden syrup in a small saucepan. Do not let it boil. Remove from the heat and add the cocoa powder, semi-sweet chocolate and vanilla. Stir until you have a very smooth, glossy mixture.
In a large bowl mix together the pistachios, figs and broken biscuits then pour the chocolate mixture over top and mix well.
Line a round 9 inch cake pan with plastic wrap. Pour the mixture into the tin and press it down well to fit, I did this lightly because I did not want to crush the biscuits. Leave to cool thoroughly at room temperature Ā for 2 hours before covering and chilling in the fridge for about 3 hours.
When set, remove from the tin, peel off the plastic wrap and place it on a cooling rack lined with wax paper upside down. Melt the semi-sweet chocolate with 1 1/2 tbsp. Crisco and white chocolate and 1 tsp. Crisco separately. Spread the semi-sweet chocolate all over the cake. I used aĀ Triangular Cake Decorating Comb over the top of the cake, then drizzled the white chocolate all over, place the Maltesers around the top of the cake before the chocolate sets.
Store in an airtight container in the fridge, let set at room temp for about 30 minutes before cutting and serving.

IMG_2094IMG_2095

Everyone that got some LOVED IT!!! Ā You must make this one šŸ˜‰

fiesta-friday-badge-button-i-party

Mini Strawberry Espresso Surprise!!! Fiesta Friday #55

35 Comments

Hello everyone it’s another Fiesta Friday!!! I want to thank our host Angie@The Novice Gardener and her co-host today Sue@birgerbird and Suzanne@apuginthekitchen. Ā Suzanne has become a great blog friend and I want to thank her šŸ™‚ Ā So enjoy Fiesta Friday everyone!!!

So earlier this week I went to my favorite place “Flying Olive” šŸ™‚

The Flying Olive hasĀ 50 varieties of olive oils and vinegar’s, I love going there because you can taste anything before buying it šŸ˜› check out their website for all the info and check out their 2 locations one each in Ohio and Kentucky.

I currently have Strawberry, Red Apple, Wild Blueberry, Cranberry Pear in the vinegar’s and in the olive oils I have Butter, Persian Lime, Cilantro and Roasted Onion and Tuscan Herb šŸ™‚

During my recent trip I got Dark Espresso Balsamic Vinegar as I just love coffee so I knew I had to get it.

So I had some strawberries at home so I knew I was going to use those some how and I was thinking of using mascarpone cheese. After getting home and checking out what I had already in my pantry, I thought this would be a perfect mini dessert. Ā A couple of years ago for Christmas my friend Danny gave me a few sets of mini plates, bowls, spoons and forks, he know how I like to entertain šŸ™‚ so this is my is my mini dessert.

IMG_1936

Ingredients (ended up not using the half n half)
If you wanted mascarpone to be more creamy
then I would add a little half n half.

IMG_1914

Added the vinegar to my strawberries

IMG_1919

Added the vinegar to the Mascarpone cheese

IMG_1920

Mixed up

IMG_1921

I crushed the Biscotti and added a little to bottom on the dishes

IMG_1924IMG_1922

Topped the biscotti with the strawberries that were soak in the Vinegar
IMG_1923

Then a dollop of the mascarpone mixture

IMG_1926

drizzle of more vinegar

IMG_1928IMG_1929

shave some chocolate, I thought this chocolate would go perfect

IMG_1930

IMG_1933

IMG_1936

Done…serve or chill until your party begins šŸ™‚

IMG_1939

Mini Strawberry Espresso Surprise

  • Servings: 12
  • Difficulty: easy
  • Print

3/4 cup Flying Olive Dark Espresso Balsamic Vinegar, divided
2 containers tiramisu flavored mascarpone cheese
1 1/2 cup fresh strawberries, chopped
3 chocolate biscotti’s, crushed
1 piece dark chocolate

In a bowl add the chopped strawberries and 1/4 cup vinegar, stir and set aside.

In another bowl add mascarpone and 3 Tbsp. of vinegar and whisk together, set aside.

Set out your mini dishes that you are going to use, add about a teaspoon or a little more of the crushed biscotti to each dish, then add strawberries on top of biscotti, start with a teaspoon on each then add more to each to finish up the strawberries. Ā Dollop mascarpone cream on each dish, then with a teaspoon drizzle a little of the vinegar over top the mascarpone and finish with some of the shaved chocolate. Ā I like this recipe as a mini since it has a great richness to it šŸ™‚

Serve or chill until needed.

This was so good, it was not overly sweet, and that tartness at the end from the balsamic vinegar was just perfect!!! Ā Enjoy the rest of your Fiesta Friday!!!

IMG_1943IMG_1946IMG_1947

fiesta-friday-badge-button-i-party