Soups Around the World!

6 Comments

Last week I had a cooking Event at one of our stores, my sponsor was College Inn Broth.

Plus I wanted to add some seasoning from a local company that is exclusive in our stores, Colonel De’s Seasonings.

So here are the soups that I did and the recipes, I hope you will enjoy and make them 🙂

Irish Garlic Potato Soup
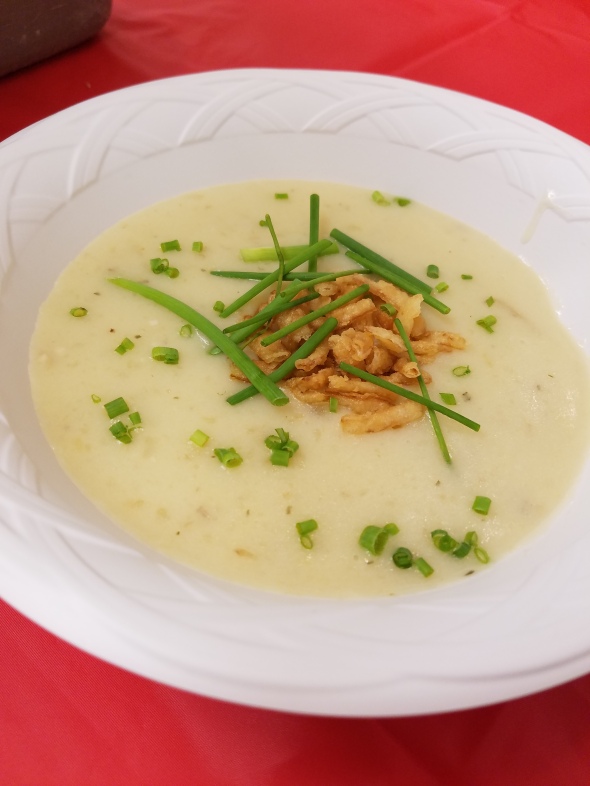
Irish Garlic Potato

Irish Garlic Potato Soup

  • Servings: 6
  • Difficulty: easy
  • Print

2.25 lb. Klondike Goldust Potatoes, sliced
.75 lb. sweet onion, sliced
3 – 14.5 oz. cans College Inn Chicken Broth
2 Tbsp. butter4 tsp. Colonel De’s Garlic Goodness
1 cup half and half
½ tsp. kosher salt or to taste

In stockpot add butter and onions, cook over med-high heat for about 5 minutes.
Add sliced potatoes, onions and chicken broth, cover and bring to a boil. Reduce heat to a simmer, add Garlic Goodness and cook until potatoes are tender.
Remove from heat, with an immersion blender blend until smooth or leave a little chunky.  If using a blender, blend in batches, just make sure the center of the blend lid is removed, place a towel over top of the lid.
Once blended add back to pot, add salt and add half and half, warm on low and serve.
Optional – Add onions straws and chives for a garnish.

Paired with Guiness Draught Beer

Mexican Pozole Soup

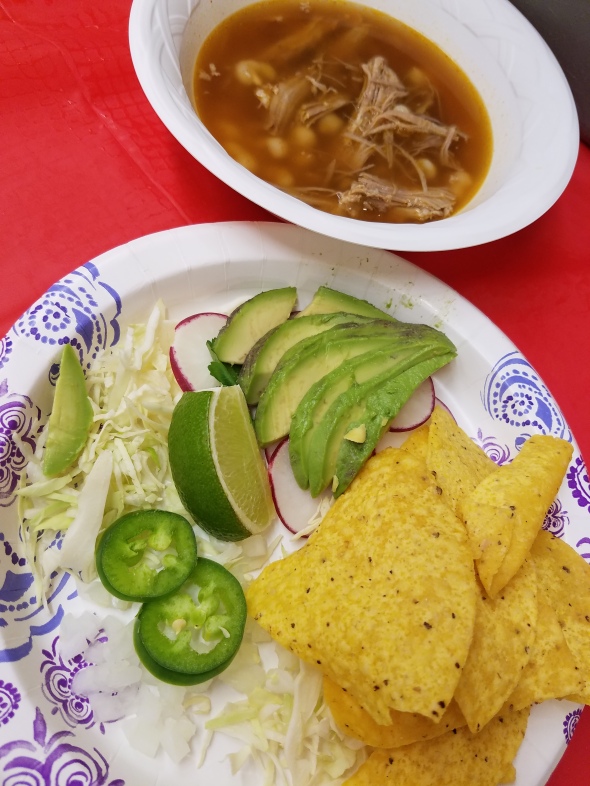
Pozole

Mexican Pozole

  • Servings: 6
  • Difficulty: easy
  • Print

2 – 15.5 oz. cans hominy
3-4 – 14.5 oz. cans College Inn Beef Broth
3-4 cups shredded pork
3 tsp. Colonel De’s Chipotle Seasoning

Add to a large stock pot broth, hominy, pork and seasonings, bring to a boil and serve with garnishes below:

Shredded cabbage
Radish slices
Chopped onion
Chopped hot peppers
Avocado slices
Lime wedges
Tortilla chips
Chopped Cilantro

Paired with Negra Modelo Beer


Avgolemono (Greek Lemon & Chicken Soup)
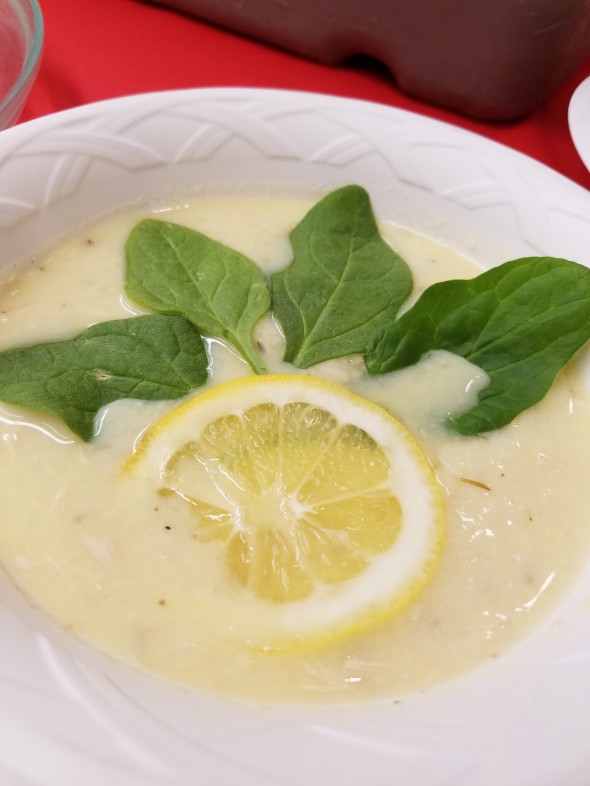
Avgolemono

Avgolemono

  • Servings: 6
  • Difficulty: easy
  • Print

64 oz. College Inn Chicken Broth
Shredded chicken breast from whole chicken
2 tsp. Colonel De’s Greek Seasonings
1 cup instant rice
4 eggs
2 tsp. cornstarch
2 Tbsp. water
¼ – ½ cup lemon juice, per your taste
salt to taste

In a large stock pot over med-high heat bring broth to a boil, covered, then add rice, chicken and seasonings, cover and reduce to low until rice is cooked.
In a medium bowl add water and cornstarch and whisk, then add eggs and beat until completely blended, whisk in lemon juice.  Take 4 cups of the hot soup and slowly add to the egg mixture while whisking constantly so that the mixture will not break.  Stir mixture into the rest of the soup.  Season to taste and serve immediately, garnish each bowl with a lemon slice and a few baby spinach leaves.

Paired with Leffe Beer


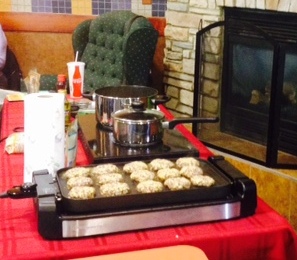
Pho Bo (Vietnamese Soup, this picture was taken before broth was added)
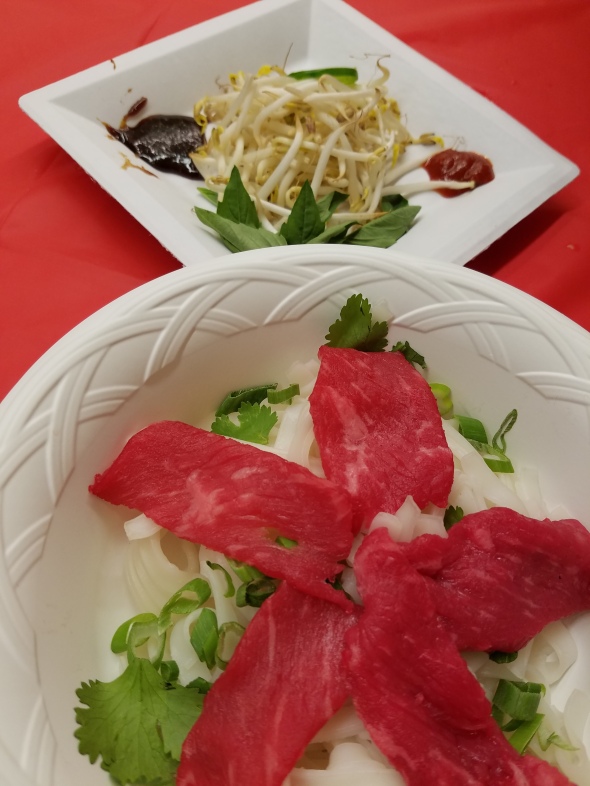
Pho Bo


Pho Bo

  • Servings: 6
  • Difficulty: easy
  • Print

8-10 cups College Inn Beef broth
1 Colonel De’s Pho soup pouch
1 pkg. rice noodles
sirloin steak, trimmed and thinly sliced, kept raw

Green onions, tops thinly slice
fresh cilantro leaves

Add broth and pho pouch to a medium pot and bring to a boil, then let simmer for 3 hours.

Cook rice noodles as directed and drain.  Place portion of noodles in a large individual soup bowls, sprinkle of green onions and cilantro leaves.

Top that with a few thin slices of raw sirloin, set bowls aside.

Make each garnish plate with below

Bean sprouts, Thai basil leaves, hot sliced peppers, some sriracha and hoisin sauce.

Before serving bring broth up to almost a boil, ladle broth in to your bowls.  And add garnishes to your bowl as you wish. 

Paired with Kirin Ichiban Beer

Hope you Enjoy!!!  Cheers – Chef Amy!!

Happy 2016!! How about some Soup!!

19 Comments

Yes I am still Alive!!! 😛

I know, I know I have not blogged in forever, but I have been very busy with work and other things.

Plus I don’t cook up a ton of things for me on a daily basis, and when I do cook for my family I am so busy doing multiple things that I forget to take pictures, and if I do I don’t often have a lot of time to blog it all out.  So I am sorry for those who care, and I will try harder this upcoming year!!

So this would be something I would not blog about since its just something plan I would come up with, but I thought I just better share this to let everyone know I am still kickin 🙂 LOL

So yesterday on my day off I thought okay you have stuff in the fridge you need to use, so I made Soup.

I call it “Winter Soup” or “What else can I put in this” Soup 🙂 LOL

IMG_4027

I also had gotten a four pack of bone-in chicken breast out of the freezer to make some room 😛

Okay so I don’t have a recipe here because really it was a what can I throw into this pot kind of soup.

And I think that is what we all need to think more of when we have things in our fridges that need to be used. Or your pantry, heck if you have can veggies do it, or cans of tomatoes or sauce, what about pasta or rice, your options are endless!!!

So this is what I started with, cabbage, zucchini, carrots and beans.

IMG_4010

Chopped it all up and I added about 2 cups of chicken broth(had some left in the fridge), I cooked it in the oven on 325 degrees for 2 hours

IMG_4011

then I added about 4 more cups of broth, I love using “better than bullion” soup base, so I had a little beef flavor left scraped that in there and then some Turkey.  Just mix that up with 4 cups of hot water added a onion power and dill.  I love dill in soup, and I love using the tube herbs, I just don’t use fresh herbs quick enough so I do buy some of those tube herbs you can find in your produce dept.  So whisked all that up and poured it right on in.

Cooked at 350 degrees now for about 1 hour, then I added the beans about 4 cups, not that whole jar, mixed, then check for seasonings, I add some crushed celery seed, more tube dill, kosher salt and white pepper.  Back in the oven for 30 minutes.

IMG_4013

IMG_4019

adding the celery seed and my tube dill 🙂

IMG_4016

Like I said I had chicken breast, so I just bought a new kitchen gadget, it was my Christmas present to myself…

Table Top Halogen Oven

IMG_3988


Now I love it, the first thing I cooked in it was a Steak, a Frozen Steak!!!   Steak (bone-in rib eye) was about 1 inch thick, I took it out of the freezer, salted and peppered each side, and in 25 minutes I had the most perfect medium rare steak…It was delish!!!

Now I know the haters are going to hate, I NOT telling you buy it, this just works for me and I like it 🙂

So I put two of the chicken breast in it and let it go, yes can I use the oven, of course, but I like this and wanted to use it, I can see it cooking and like the easiness 🙂

So here’s my chicken cooking, of course once it was done again I forgot to take pictures…sorry, but it they looked great.

IMG_4029

So I shredded some of the chicken

IMG_4017

and added it to the soup, and it was done and ready to eat.

IMG_4028

I have soup for the next week and I frozen half of it too, I like doing this so its easy to bring out and heat out when you need something quick.

So what do you have in your fridge right now that you can throw into a pot and make your own

“Winter Soup”

Enjoy everyone!!

IMG_4022

Roasted Garlic Bean Dip Recipe!!

19 Comments

Okay so I am trying to think of new ways to get my face out there in the world…yikes 😉

So I started to make videos, some will be product tests and some will be recipes.

This is just in the beginning stages, I only have a iPhone and my computer, but I am trying to make them better and better, sometimes I just laugh at myself when I watch them back :p LOL

But you have to start somewhere right, I will get better and its okay if you laugh I will not mind 😛

So here is the first one I did so check out I hope you enjoy it!!

FYI – I have already changed few things from this first video like I said it is a work in progress 🙂

Roasted Garlic Bean Dip

  • Difficulty: easy
  • Print

1 can Cannellini beans, drained and rinsed
1/4 cup roasted garlic
1/2 tsp. kosher salt
1/4 – 1/2 tsp. sweet paprika
1/4- 1/2 tsp. hot paprika
2-4 Tbsp. extra virgin olive oil

In a food processor add garlic and pulse a few times, then add beans and seasonings, pulse again and add oil and pulse until mixture is smooth.

Then serve with chips or veggies, you can also add spread on tortilla for a wrap.


Quinoa Burger!!!

7 Comments

Oh its just SOOOO GOOD!!!!

IMG_1785

Yes is really is 🙂  Back in December when I needed to come up with a “Theme” or “product” for my cooking class, one thing came to mind…Quinoa!!

Quinoa I feel is something that people heard of??? But not sure what it is, or what to do with it let alone know how to pronounce it 🙂

Most the time you see a recipe for Quinoa it is in some sort of salad and I just wanted to do more with it.
I’ll say its funny because just a few days before my class and her now a week after I have seen more recipes with Qunioa in it I just had to laugh.

Any way for my class yes I made a burger, I also put it in Minestrone Soup, as a breakfast dish like oatmeal, of course a salad 🙂 and cookies, yes cookies 🙂 with only 4 ingredients 😉

When I make my quinoa, I do 3 to 1, 3 parts water (liquid) to 1 part dry quinoa.  I rinse it really well till the water runs clear, oh and make sure you have fine mesh strainer, you don’t want that tiny seed going down your drain 🙂

I then add it to my pan with the water, I turn it on med-high, uncovered and bring it to a boil.  Once it starts to boil, depending on what I am doing with it, I will then add some flavoring, broth base or seasonings.  I then stir that in reduce the heat to low, cover it and let it go for at least 20 – 30 minutes, again depends on the quantity of quinoa that I use.  The more I have the more time I let it cook, I like mind to kind of get sticky, a little like sticky rice, for my burger I may let it go for a little longer.
Then you just go from there with whatever you are making 🙂

So of course I did not get to take any pictures of my food at my class, I got some picture of the people that came but once I starting cooking it was a little hard 😛 LOL

About my burger, you can make this any flavor you want, once you have the mix add what ever seasonings you want, so the last night when I got home from work I made them 🙂

Of course at the same time I was trying to cook up some things for the week, I made Lentil Soup and a pork tenderloin.  Of course my mind was everywhere and I forgot the beans…yes beans 🙂

So here we go…

Ingredients  – Ouinoa, onion, seasonings,
beef base (optional) and cannellini beans(not pictured)

FullSizeRender (23)

I rinsed my quinoa

FullSizeRender (19)


Make sure it drained

FullSizeRender (10)

I add it to the pan with my water

FullSizeRender (16)

Once it boils

FullSizeRender (20)

I then add some beef base and cover

FullSizeRender (18)


This is almost done

FullSizeRender (14)


As you can see the quinoa expand’s and get’s thicker

FullSizeRender (6)

At this point I put it on a plate to cool
(if its cool, it’s easier to handle)

FullSizeRender (17)

Now the onion in a skillet with a little oil

FullSizeRender (15)


Saute up

FullSizeRender (12)

add the quinoa, onions, seasonings and beans

FullSizeRender (8)

mix together

FullSizeRender (4)

then add the cheese

FullSizeRender (11)

now make your burgers
Put them in the fridge for a least 2 hours to
help firm up.

FullSizeRender (9)


Then cook for about 5 minutes on Medium to Med. High

FullSizeRender (24)

Flip it

FullSizeRender (2)


add cheese and let melt

FullSizeRender (7)

Get you bun ready, of course I toasted my
whole wheat bun added some fresh spinach
and horseradish

FullSizeRender (5)

Done and Delicious!!!

FullSizeRender

Quinoa Burger

  • Servings: 8
  • Difficulty: easy
  • Print

8 regular size burgers

1 cup quinoa (red or white)
3 cups water
1 tsp. Better than bullion beef base (optional)
4 tsp. seasoning (I used Grillmates Worcestershire Pub Burger)
1 large onion, chopped and sauteed
1 cup Cannellini beans, drained, rinsed and blended in food processor (you could use the whole can)
1 cup cheese, fancy shredded (any flavor)

Rinse quinoa in fine mesh strainer until water runs clear, drain, add to med sauce pan with 3 cups water, cook on med-high uncovered.  Once it comes to a boil add beef base, stir and cover, reduce heat to low, cook for 30 minutes or until water is almost gone and quinoa has expanded and is thick, give a few stirs to make sure all water is gone.

Pour out on to a plate and let cool, once cooled, add sauteed onions, blended beans and seasonings, mix very well to blend.  Taste, add more seasonings if needed, then fold in cheese.  Form your burgers and place them on baking sheet lined with parchment paper, put in the fridge for at least 2 hours or longer.

Add oil to skillet add your burgers, cook over med to med-high for about 5 minutes, burger should have a nice brown color like a burger would have 🙂

Flip and then add some cheese on top if you want, cook another 5 minutes or so, add to your bun and dressing with your favorite toppings.  Enjoy!!

At my class I did a BBQ Bacon Cheddar with crispy onion straws 🙂

They all enjoyed it for sure 🙂

Here they are at the class and the crowd that came 🙂

I had to make the burgers in batches, so many came 🙂

FullSizeRender (21)

FullSizeRender (27)

FullSizeRender (25)

FullSizeRender (29)

FullSizeRender (31)


Chicken Fettuccine…On the Lighter side!!

8 Comments

Looking for a healthier lighter Chicken Fettuccine?

pasta1 (2)

I used Almond Breeze unsweetened Coconut Milk. Coconut Milk! I know what some of you’re thinking ~ “What! Really it is good?” and before you ask I’ll answer ~ No it does not taste like coconut! 🙂

When you order this dish in a restaurant or search online a Chicken Fettuccine recipe they usually call for heavy cream, butter and lots of cheese!!Let me just say that 1 cup of Cream is like 800 calories vs. the coconut milk which is only 45 calories and if you noticed I did not use any butter either.

Now don’t get me wrong the stuff made with all the cream, butter and cheese is great, but maybe not so healthy for us, go give this a try I promise you like it 🙂

For the entire month of September, three of our Remke Market locations will have all of these items on sale.  So stop by our Hyde Park, Skytop or Highland area stores in Ohio.  Most of all the other locations may only have some of these one sale. Everyone loves a Great Sale!!

Oh and if you visiting my blog for the first time, please look to right side of this page and see where it says follow me via email, enter your email address in the box and click the “Follow Chef Amy” link to follow me, then every time I post a new recipe or talk about great products or places I might have been, you get an email about the new post.  Once you have added your email address, make sure to go to your email and confirm the link to ensure you will get my posts!!

Ingredients

photo 1

put pasta on

photo 4

photo 1 (5)

in skillet add oil and shallots (or onions)

photo 1 (2)

cook until translucent

photo 5

finely chop your rosemary (my rosemary looks dark because I freeze it, when I buy herbs for recipes if I don’t use them all up, I will just put the container right in the freezer then whenever I need to something for a recipe I am cooking I have some.  I only use the herbs from the freezer when I use them in a cooking recipe not if I need it for fresh recipe like salads or on top of a dish)

photo 3

I grate my garlic cloves always it is just so easy, so add garlic and rosemary to skillet

photo 3 (3)

using cornstarch will help thicken the sauce (I forgot to add it to my picture above) 🙂

photo 4 (3)

add mixture to skillet and whisk often until it comes to a bubble and thickens

photo 5 (3)

once it bubble and thickens add cheese and whisk

photo 1 (3)

photo 4 (2)

drain pasta (you might want to do this and have ready before you add your cheese to the sauce)

photo 1 (4)

add the sauce to pasta and toss to coat the pasta, pour pasta out onto a big platter or bowl, top with your chicken

photo 2 (4)

you can garnish with fresh chopped Italian parsley and some shredded or grated Parmesan cheese

photo 2 (3)

and done

pasta5

Lighter Chicken Fettuccine

  • Difficulty: easy
  • Print

1 lb. pasta, cooked & drained
1 – 2 large shallots (1/2 cup)
3/4 cup fresh Grated Parmesan
2 1/2 cups Almond Breeze unsweetened Almond Milk or unsweetened Coconut Milk
4 tsp. cornstarch
1 tsp. fresh rosemary, minced
4 garlic cloves, minced
2 tsp. olive oil
2-3 cooked chicken breasts,  or grilled chicken thighs sliced
2 tbsp. Italian parsley, chopped
salt and pepper to taste

Cook pasta as directed, meanwhile in a large skillet over medium heat add oil and shallots, cook until onions are translucent; add garlic and rosemary and continue to cook for 1 minute more.

Whisk milk and cornstarch together then add to skillet, whisk mixture until it starts to bubble, once bubbling and begins to thicken whisk in 1/2 cup cheese.

Drain pasta, add pasta to the skillet and toss with the sauce until well coated, plate pasta, add chicken on top and garnish with parsley and extra cheese.

pasta3 (2)

pasta4

Enjoy!!!  Thank you for coming!!! Chef Amy


Golden Beet Chips!!!

10 Comments

Yum…Yum…YUMMY!!!

IMG_20140528_165357

You either like beets or you don’t there is no in between!! 🙂

I don’t like beets…well okay maybe if they are “Amish Wedding” Pickled Baby Beets…then yes I like those 😛

But that’s it on the “Red” ones…I do on the other hand like the “Golden” beets 🙂

Golden beets are a little less sweet, more mellow and less earthy.

These chips were so easy to make and Delicious but you must keep an eye on them as they will burn very quickly!!
But I like those little burnt edges 🙂

Golden Beets

IMG_20140528_160635

Peeled and sliced

IMG_20140528_161123

oil, salt, pepper and paprika

IMG_20140528_161357

Toss to coat them

IMG_20140528_161518

place on a baking sheet, you do not have to place on a baking rack
Keep checking them, they do burn easy…

IMG_20140528_161759

Golden Beet Chips

  • Difficulty: easy
  • Print

Golden Beets
Olive oil
Salt
Pepper
Paprika

Peel and slice your beets, use a mandolin if you have one.
Place in a medium bowl, drizzle with olive oil, then sprinkle with salt, pepper and paprika.
Toss to coat all the beet slices.

Arrange on a baking sheet in single layer, bake at 375 degrees, after 15 minutes you need to flip them, check that small rounds are not burning.  Continue to bake until they are crispy, about 15 minutes more.

When I first made them I baked them at 400, I would go to 375 or even 350, flipping them at 15 minutes and continue to bake until crispy.

Let them cool and Enjoy.

Enjoy!! Them 🙂

IMG_20140528_165357

Wild Harvest Three Bean Salad

5 Comments

cover

So this weekend in one of our stores we had the Wild Harvest Beans on sale and we were having a food demo on the beans.  So I thought I could come up with a simple and quick recipe for Three Bean Salad.

So we had Black Beans, Pinto Beans and Garbanzo Beans, now how about some crunch…celery, onion that sounds good, I do have some fresh rosemary so lets add that, and parsley is a nice addition too.

We will use some apple cider vinegar…I know, I know any of you that truly follow me know that I absolutely love Balsamic Vinegar (especially the kind we sell in our Hyde Park store back in the Deli)…but I’m changing it up on you plus a lot people use it in lots of recipes so they may have that on hand.  Okay a little sugar for sweetness, oil and good old salt and pepper.

I think everyone liked it, I didn’t stay while it was being sampled but I did get an email from one the manager’s saying how awesome it was…so let’s see if you all do too!! 🙂

Ingredients

IMG_20130419_110602

drain and rinse you beans

IMG_20130419_111839

add to a big bowl, beans, celery, onions, parsley, rosemary
and give stir

IMG_20130419_120212

whisk together vinegar, sugar, salt, pepper and oil add to bean mixture

IMG_20130419_122038

IMG_20130419_121435

Recipe

1 can Pinto Beans, drained and rinsed
1 can Black Beans, drained and rinsed
1 can Garbanzo Beans, drained and rinsed
1/2 cup celery, diced
1/2 cup red onion, diced
1/2 cup fresh parsley, finely chopped
1/2 tbsp. fresh rosemary, finely chopped (or dill would be nice)

1/4 cup extra virgin olive oil
1/3 cup apple cider vinegar
1 tsp. salt
1/2 tsp. pepper
1/3 cup granulated sugar

In a large bowl add beans, celery, onions, parsley and rosemary, mix and set aside.
Whisk together in a small bowl vinegar, sugar, oil, salt and pepper, then pour over beans and fully combine to coat.

Put in refrigerator for a few hours or over night, let set about 30 minutes to an hour at room temperature before serving. 

This would be fantastic for afternoon picnic or backyard BBQ this summer!!

Here it is in my containers ready for the demo, I failed to take a picture of it in a dish…sorry 😦

IMG_20130419_124721

Homemade Granola

7 Comments

Homemade Granola is everywhere, pic 1

or I should say store made…You see in a lot of stores their own brand of homemade granola and it really is good if have not tried it you should give it a chance.  But I’ve always just wanted to make my own so I could control what was in it, seeds, nuts, fruit, honey or sugar or maple syrup or whatever.

So as I decided to make this I was thinking what do I want in it, I like pecans, walnut, pepitas (pumpkin seeds), pistachios, coconut and then I was thinking what else……….I got it…..Chia Seeds!!  Yes I know what you are thinking the “Chia Pet” this terracotta figurine, shaped in all kinds of characters.   You soak the figurine in water and then spread the seeds and watch it grow….well you are right  chia

But you can eat the seeds too and the people of the ancient Aztec and Mayan empires revered chia seeds as vital nourishment.  They are packed with Omega-3, protein, antioxidants and fiber.

While  getting my chia seeds, I saw Toasted Hemp Seeds and I thought…huh?…why not…They are high in protein, potassium, Fiber, Omega-3
and Omega-6, who knew…LOL!!

Okay so now I have all my so called nuts and bolts I need sweetness…I could use maple syrup which most recipes call for…and I found some locally but they also had Apple Cinnamon Syrup, I knew that was what I wanted to use, so I am now ready to go.

Ingredients

pic 2

I used Coconut oil to add to my syrup, I like using coconut oil in my everyday cooking, cook on low , stirring until coconut oil is melted

pic 4

once melted add vanilla and salt, stir to combine then set aside

pic 5

in a large bowl add nuts and seeds, mix to combine, if adding fruit you will add that after baking

pic 3

pour the oil and syrup mixture over nuts and seeds

pic 6

 stir to make sure everything is coated

pic 7

pour mixture to baking sheet and spread out

pic 8

bake at 325 degrees for 25 – 355 minutes, stirring half way through, I like my granola on the very crunchy side, so I let it get really brown, so keep in and stirring as it gets brown, just don’t let it burn

pic 9

Serve over yogurt or with milk

pic 10

Recipe

Homemade Granola

3 cups oats (not quick oats)
1 cup coconut flakes
1/2 cup pecans
1/2 cup walnuts
1/2 cup pepitas (pumpkin seeds)
1/2 cup pistachios
1/4 cup chia seeds
1/4 cup toasted hemp seeds
3/4 cup apple cinnamon syrup
4 tbsp. coconut oil
2 tsp. vanilla
1/2 tsp. salt

In a large bowl add the first 8 ingredients, stir to combine set aside.

In a small sauce pan add coconut oil & syrup, cook on low stirring until just melted, then add vanilla and salt and mix till salt is dissolved.
Pour oil mixture over the nuts and seeds, and toss to fully coat, pour mixture on to  two baking sheet and spread out, bake at 325 degrees for 25- 35 minutes.  

Let cool completely, if adding dried fruit so it at this point and store in air tight containers for up to a month, if it lasts that long!!

Have some on yogurt, or even Ice Cream, or just pour milk over it, or eat just as is…I don’t like mine that sweet, so this is not that sweet as other recipes can be, I also added some dried tart cherries at the end.  

I hope you will try and enjoy!!!